Friday, October 29, 2010

another party treat

Goat cheese and sun dried tomatoes are a perfect pair.  Years ago, on some long forgotten cooking show, I saw a chef blanket a log of goat cheese with sun dried tomatoes, wrap it up in grape leaves, and roast it on the grill.  So I tried it.  It was delicious, but the tomatoes were hard to cut through, and I thought there was some opportunity to bring more flavors to the party.

Which made me think of pesto.  I toasted some pine nuts (about 1/3 cup), soaked some dried tomatoes in hot water for about 15 minutes, and threw the tomatoes, pine nuts, and some basil in the food processor.
the tomatoes and pine nuts are first chopped,
then basil and a little olive oil bring the pesto together

I rinsed and dried jarred grape leaves, available at most supermarkets, then laid out a double layer on wax paper.
the grape leaves need to be long and wide enough
to wrap the goat cheese like a burrito

The rest is simple.  Lay the goat cheese log on the grape leaves, and simply pack the tomato pesto around the outside.

the grape leaf covered goat cheese can be wrapped in the 
wax paper, and refrigerated for a couple of days

The cheese can be cooked, until very soft, either on a grill or in the oven.  Once the cheese is very soft to the touch, simply cut open the grape leaves, and serve the warm cheese smeared on slices of toasted rustic bread, dabbed with olive oil infused with garlic.  It is delicious, and a big hit at parties.

Tradition for preparing bruschetta is to slice a hearty bread, like French bread or boule, toast it, and rub it with a garlic clove, then drizzle it with olive oil.  Seems like a bit too much work for me, so I toast the bread, then brush it with olive oil that has been infused with fresh garlic.
a few smashed cloves of garlic in olive oil
makes wonderful garlic bread, brushed on 
toasted, rustic bread

The grape leaves can be cut open at the top, and spread open to display the warm cheese, with toasts on the side for guests to help themselves, or the cheese can be spread on the warm toasts, and served individually.
rustic, warm toast with goat cheese and tomato pesto

It makes a wonderful appetizer, or even a nice side dish for a bowl of soup and a salad.  Leftovers will keep in the fridge for about a week.

Wednesday, October 27, 2010

etouffee, Brutus?

We have a new Trader Joe's in Greenville, and in an attempt at browsing around (mucho crowded), I came across a bag of good looking, frozen langostinos, which, my research says, are sort of like a cross between a shrimp and a lobster, both in flavor and in texture.  Which reminded me of another little morsel, known in the bayou country as mudbugs, mudpuppies, yabbies, crawdads, and crawfish.  If you are a damn yankee, you can call them crayfish.

At any rate, I had a bag of pretty little pink and white crustacean tails, and little idea what to do with them.  Which made me think of an old favorite.  Crawfish etouffee.  Spicy seafood stew loaded with vegetables and served with rice.  Yum.  So I went to my go-to cajun cookbook, Paul Prudhomme's Lousiana Kitchen, and took a look at his etouffee recipe.
much loved and long used tome on NOLA cooking,
but there is a reason he is so fat

It's good -- dark brick red roux, the holy trinity (onions, green peppers, celery), seafood stock, and mudbug tails with chopped green onions.  Oh, and enough oil and butter to cause a heart attack right in the middle of dinner.

Hmmm.  What to do?  So I started a little google search, and came upon...... abomination.  Muddy, thick concoctions loaded with canned soups, improperly cooked roux, and bizarre additions of tomatoes, Old Bay seasoning, and cream.  Huh?  Well, the root word is apparently "étouffer", which is French for "to smother" and there seems to be no shortage of cooks hell bent on asphyxiating this wonderful dish.

At its best, etouffee most resembles a less complicated gumbo -- rich deep brown gravy, vegetables, and delectable little morsels of seafood.  It is, most emphatically, not a back of the soup can recipe.  So, I find myself forced to turn inward and try to lighten Paul's version of the dish without murdering its spicy, warm, and simple flavors.

I much prefer red peppers to green peppers for their sweeter, more complex flavor, but in this case, in deference to the fabulous cuisine of  southern Louisiana, I am sticking with the originals.  Now, how to get all that butter down to a reasonable level, so my obituary doesn't read, "woman killed by crawfish stew".

I started with the roux.   Prudhomme cooks his on lava level heats, in just a few minutes.  Tradition calls for low and slow, taking sometimes up to an hour to get to a dark, brick red hue.  I decided to go right down the middle, cooking the roux over a medium high heat, stirring for about 20 minutes, and cutting the heat off under the roux right after it reached a rich brown color, to minimize the chances of burning.  I started with three tablespoons of vegetable oil and three tablespoons of flour over medium high heat.  Pictured below, there is a blond roux just beginning to foam, a brown roux, about peanut butter colored, and a dark brown roux.  The next step is brick red, but I couldn't photograph it.  The second  it hits that color, the veggies needed to go in to stop the roux from cooking any further.


The Cajun holy trinity is green pepper, onions, and celery.
mise en place, clockwise, the holy trinity,
spice mix, chopped green onion, seafood stock concentrate,
and sliced garlic


I had a reduced seafood stock on hand, available at Whole Foods, and on Amazon as well.
this is a convenient product, but there are 
fish stocks available in most supermarkets as well

The spice mixture is salt, cayenne pepper, and thyme.  Prudhomme uses two sticks of butter for six servings of etouffee.  Out of the question.  So I needed a way to reduce the fat and retain the flavor.  After adding the trinity, I added half of the seafood stock base, the spice mixture, the garlic, a bit of dry sherry, and a couple of cups of water, and simmered the whole together for about an hour.  Once I had the rice on to cook, I added the langastinos, still frozen, the chopped scallions, and a bit of chopped parsley.  Success!  The stew was rich tasting, the langastinos tender and sweet, and the broth spicy and smooth.  My plan had been to stir in a couple of tablespoons of butter at the end, but I just plain forgot, and it didn't matter.  It was just fine without the extra fat.
NOLA on a plate

Tuesday, October 26, 2010

a lesson in cakes

I am writing a weekly cooking article for an area paper, and I try to stay on theme for the main food page.  Well, next week is cakes.  I bake, but I bake bread and pies.  I usually rely on Miss Betty when I need a cake, which is not often, because Jim is a pie kinda guy.  But I had an unusual opportunity.  My friend Paula is a trained pastry chef, and much too nice a person to tell me to buzz off when I asked for a lesson in cake baking.  And an interesting lesson it was.

 First off, equipment matters, and that includes both hardware and software.  A mixer of some sort is a must.  (all deserved deference to the ladies of yore, who mixed their cakes by hand, but these days no one would ever have their cake if that were still necessary.)  A stand mixer is better, though I imagine a hand held mixer would do, but you might end up with carpal tunnel.   A 12 inch serrated knife and cake rounds both make for a prettier cake.  As does some way to elevate and turn the cake easily while frosting it.  Of course, Paula had a pro's revolving cake stand, and if you are going to bake a lot of cakes, I imagine it would be worth acquiring one.  I saw Alton, on an episode of Good Eats, make a revolving stand by taking a cheap plastic lazy susan, and set it on top of a spring form pan, which is an interesting solution for the occasional baker, but even he insisted on cake rounds.  Amazon has cake rounds for cheap, and with free shipping if your total order is over $25.  Which brings me to books.  Paula often consults Julia Child's book on baking, and I want one now.  Cake flour matters.  If you are going to bother baking a cake from scratch, buy some cake flour.  As does a decent spatula for frosting.

Another surprise, which makes total sense when you think about it, was Paula's consultation for recipes of some of those old timey, spiral bound community cookbooks, often the product of a ladies church league project.  What cake do you crave?  Something from a commercial bakery, or the cake your grandmother used to bake for your childhood birthdays?

We settled on a cake called "Harvest Moon" from one of those old spiral bound books.  It is essentially a brown sugar yellow cake.  I learned, while perusing that recipe (at the end of this post), that 3 cups of cake flour, sifted, is different than 3 cups of sifted cake flour.  The first means measure then sift, the second means sift, then measure.  And it does make a difference, by changing the total volume of flour in your cake, which will change both texture and moisture in the finished cake.  Another must is the proper creaming of the butter and  sugar.  The butter should be soft, but not too warm, or the friction in the mixer will melt it before it lightens.  The butter is creamed until the color begins to lighten, then the sugar is added and the creaming continues, until the sugar is fully incorporated, and the whole is a smooth, light paste.   No skimping or short cuts allowed.

Paula chose a brown butter frosting for the cake, and it was a revelation.  It is a simple powdered sugar frosting, just like my mom used to make, but browning the butter made all the difference in the world.  To my adult palate, my mom's frosting of powdered sugar, butter, milk, and vanilla is too sweet and rather one dimensional.  By browning the butter first, melting the butter in a sauce pan until the milk solids drop to the bottom of the pan and the butter turns a light nutty brown, she brought a whole new dimension to the simplest of frostings.  The butter took center stage, instead of the sugar, adding rich caramel notes to the frosting.

notice the light colored cake pans--
light color=lighter, finer crust on the cake
I am tossing my cheap, dark cake pans 
and getting the real deal

Once the cakes are cooled, that 12 inch serrated knife comes into action.  Cutting the domes off of the cake means you will have a cake that looks like a cake, rather than a alien space ship.  Just slice gently, parallel to the cutting board, while slowly rotating the cake.  Doing it on a revolving cake stand is even easier.
Paula's son, Tal, has a finely tuned radar,
with the ability to know the exact moment
the removed cake domes are up for grabs

What you see above is called "masking."  It is applying a thin layer of frosting over the cake, to contain crumbs and keep the final product pristine and crumb free.  We didn't have the time, but Paula suggested that freezing the cake for an hour or two before masking makes icing the cake even easier, which was a bit of an "aha" moment for me.  I use that technique to make several different tasks easier, like grating cheese or grinding meat.

Okay, now, I am going to let Paula's icing demo speak for itself.  Awesome:


Notice how she never lets the spatula touch the cake -- it is always on the frosting.  That's just a little more insurance that you'll end up with a cake this beautiful and crumb-free.  I'll never consult the boxed cake goddess again.

The cake recipe:
2 sticks butter, softened
1 1/4 cups brown sugar
3 egg yolks
3 cups sifted cake flour
1/2 tsp salt
1-2 tsp vanilla
1 cup whole milk
Have all of your ingredients at room temperature. Don't skip this step.  Really.  I mean it.  Preheat your oven to 350.  If your oven seems to run either hot or cool, get an oven thermometer and use it to adjust to the correct temperature.  On second thought, just get an oven thermometer, period.
Begin creaming the butter at medium speed in a mixer, until it lightens and begins to increase in volume.  Add the sugar a half a cup at a time, and cream until you have a silken smooth, light paste.  Continue to beat while adding the egg yolks one at a time, waiting until each is incorporated to add the next.  Add salt and vanilla and incorporate.  Incorporate 1 cup of flour with 1/3 of the milk by alternating additions.  You can do this in the mixer, but if you want to be assured of a light, tender crumb, just do it by hand with a rubber spatula.  The less beating during the flour incorporation, the better -- you want a minimum of gluten development.  Bake in two greased and floured 8 or 9 inch cake pans.  For even greater ease of removal, line the pans with greased parchment paper.

Bake until the center of the cake just springs back, and a toothpick inserted in the center comes out clean -- about 30 minutes, depending on the size of your pans.  Check after 20 minutes, then watch them like a hawk.  No one likes dry, overcooked cake.

Amazing Brown Butter Frosting
2 cups butter
32 oz powdered sugar
1/2 cup milk
2 tsp vanilla

Put the butter in a saucepan over medium low heat, and heat until the milk solids sink to the bottom, and the butter becomes a fragrant, nutty brown.  Be careful, and watch closely.  It is easy to burn butter.  As soon as you begin to smell the fragrance and the butter becomes a pleasant shade of light brown, pour the butter carefully into a mixing bowl, leaving behind the milk solids, which will impart a bitter flavor to the frosting.  That was the hard part.  Now, just dump in the other ingredients, and beat away with a hand mixer, a stand mixer, or your muscles, until the frosting is creamy, smooth, and light.  Start out very slowly until the sugar is moistened, or you and your kitchen will be wearing half of the powdered sugar.  Chill, then frost as shown above.

Have your cake, and eat it too.

Monday, October 25, 2010

oops

Well, I said I would post about mistakes...  I have been cooking so obsessively for so long, that I don't have many mistakes, but last night was the exception.  Saturday night I made a batch of  stuffed mushrooms to take to a party.  I had a bit of the filling left over, along with at least half of the beautiful jumbo lump crab meat I bought to make the mushrooms.  So I decided to use the leftover filling, add the rest of the crabmeat, another handful of breadcrumbs, and a bit more parmesan, and make crab cakes for Sunday night dinner.  So far, so good.
the formed crabcakes were pretty, and 
loaded with crab and good flavor

Well, I guess cheese is not necessarily a great binder for something that is going to be sauteed in oil.  Though the cakes had set up beautifully overnight in the fridge, after a few minutes in the sizzling pan, I had a mess.  The cheese was sticking to my spatula, and the crab cakes were breaking apart into lumpy piles of crispy crab meat.  The good news is, they still tasted good.  The bad news is, they looked like a train wreck on the plate.
ummm, crab lumps, anyone?

I think the lesson from my mistake is to add an egg to bind the breadcrumbs with the meat.  I think if I had thought to do that, and reduce the cheese a little, I would have had perfectly pretty little cakes.

The accompanying pasta with roasted red pepper sauce, however, was a complete success, and a perfect pairing with the crab.  Jim is encouraging me to take another stab at the crab cakes, since the flavor was so good, and he definitely voted a thumbs up on the red pepper sauce, which was a nice change from a tomato based sauce.
I started with long, thin tapered sweet red peppers they carry at Costco, called "Ancient Sweets".  I have no idea what type of pepper they are, and I have never seen them anywhere but Costco -- if you can find them, give them a try.  They are perfect for roasting, with a really intense, rich flavor.  Regular red bell peppers would work as well, and the easiest solution would be to simply use jarred, roasted red peppers, but be sure to rinse the brine off of those.  The easiest way to roast them, for me, is to put them in a single layer on a sheet pan, and run them under a hot broiler.  You do have to watch them fairly closely, and give them a turn, but they turn out nice and toasty, and the skins slip right off, after a quick rest in a covered bowl or a paper bag.
the skin slips right off of the roasted peppers --
an easy, though a bit messy, job

To mellow the bite of the garlic a bit, I simmered four cloves of garlic in about a cup of cream, along with a sprig of thyme, and a big pinch of red pepper flakes.  I had cream, so that is what I used.  Half and half would lighten the sauce a bit, but you have to be more careful, because if it comes up over a simmer, it will split and curdle.  I have read some recipes that even use non fat condensed milk, which I am going to try.  I'm sure it really cuts the calories.
fifteen minutes in the cream at a low simmer will
mellow the bite of the garlic without muting its 
flavor too much.

Once the cream has simmered, pluck out the thyme, and simply add the cream and peppers to a blender.
smooth, creamy, beautiful sauce is just 
a couple of minutes away

From the blender, the sauce goes back in the cream pan, to warm a little.  If it is too thick, just thin it with a bit of milk or water, add a little squeeze of fresh lemon juice for some brightness, and add salt to taste.
a bright, pretty sauce packed with flavor

When I make this, I make extra for the freezer.  It is great on pasta or gnocchi, would be good as a sauce for fish and seafood, and even as a dip for vegetables or chicken fingers.

Saturday, October 16, 2010

the glorious onion

I made a batch of beef stock the other day, and didn't want to freeze it all.  That's the perfect excuse for a nice pot of French onion soup.  A properly made pot of onion soup is not a difficult thing, but it does take some time -- most of it hands off, but time nevertheless.  I started with the onions I had on hand; three sweet onions, a couple of purple cippolinis, and three shallots.  A proper onion soup takes a lot of onions, because they reduce in volume at an amazing rate as they caramelize.  A mix of onions is not necessary, but I would avoid using all super sweets, like vidalias or sweet 100s, because their sugar will concentrate to the point of making the soup taste too sweet.
a mix of onions, sliced

The onion slicing goes very quickly, because it doesn't really matter if they are different sized slices.  Caramelization will reduce them all to silky threads of onion.  I start with a dutch oven on top of the stove, sweating the onions down a bit while the oven heats to 325.
15 minutes over medium heat will reduce 
the onions by half

Once the onions have lost some of their moisture, I slide them, uncovered, into the low oven, to continue to caramelize.  While this method takes more time than caramelizing on top of the stove, it requires much less work.  Since my beef stock contains no salt, at this point I added in a couple of teaspoons of salt.  It took almost two hours for the onions to caramelize fully, but all that was required of me was a couple of minutes to stir the pot every 45 minutes or so.
the fully caramelized onions look a mess,
but all of that brown around the edges
will add tons of flavor to the stock

I stirred in a heaping tablespoon of flour, cooked that for a few minutes, then used a bit of sherry and spot of cognac to deglaze the pan on top of the stove, poured in the beef broth, along with a couple of bay leaves and a sprig of thyme, and slid the now covered pot back in the oven to simmer for another couple of hours.  Again, hands-off time.
deglazed pot, ready to head back to the oven

Towards the end of the oven simmer, I grated some gruyere cheese, and toasted a couple of slices of hearty french bread.  You don't want a soft bread, that will turn to mush in the soup.  The traditional soup starts with the bread in the bottom of the bowl, then soup, then cheese, but I like the slightly more textural crunch from floating the bread on the soup, and then topping it with the cheese.
toasted bread and grated cheese for the soup topping

There are schools of thought on this classic soup that the cheese must be sliced, and then draped over the edges of the bowl, to create a seal on the bowl of hot soup, but I prefer the pockets of air from grated cheese, that allows little spots on the toast to continue to toast under the broiler.   Ten minutes about 6 inches from a high broiler creates a crispy, creamy topping for the complex soup below.
 
crispy, creamy toast, with nicely browned cheese
and succulent stock with onions underneath
add a salad on the side, and it's a meal

While there are faster methods for making this soup, they require much more hands-on attention than the oven method.  Either way, it takes some time and care, which is probably why it is usually relegated to restaurant fare by most people.  But, one thing is true -- there is a lot of really bad restaurant French onion soup lurking around out there in restaurant land, and making it at home is one way to assure that this treat is really a treat.

Friday, October 15, 2010

a little schnitzel and potato salad for Oktoberfest

Oktoberfest is a big celebration for Germans, and since I am half German, and know very little about German food, I thought that was a good reason to do a little research.  A schnitzel is really about a style of cooking meat, and it doesn't really matter if it is veal, pork, chicken, or even wild game.  The Austrians tend to use veal, the Germans, pork.  So I decided to give it a go with some boneless pork loin chops.

I started by arranging the chops on a plastic cutting board (one I use only for raw meat, because it can go in the dishwasher,) covering them with a little plastic wrap, and whacking away at them with a meat pounder.  A sturdy rolling pin or a heavy pan would work as well.  One of the key elements of a schnitzel is using a very thin piece of meat.  I went for about a quarter of an inch thickness.  Next time I make it, I will go even thinner, because I discovered that the meat shrinks back up a bit as it cooks.
pounding the meat thin makes for faster cooking
and moister meat

The cooking part is really very simple.  Season the meat with salt and pepper and set it aside.  Line up three dinner plates on the counter.  In the first one, put about a cup of flour for four cutlets -- more if you are making more chops, less if you are making fewer.  In the second plate, break a couple of eggs and add a tablespoon of milk.  Whisk that together.  In the third plate, put breadcrumbs.  I used panko breadcrumbs, which is hardly authentic, but I like their ease of use and the way they get super crispy, but any fine, dry crumbs will do.  Simply dip the cutlets in the flour, then the eggs, and finally the bread crumbs, shaking off any excess, and pressing on the crumbs to adhere them firmly to the meat.  Setting the coated chops aside for a few minutes to allow the crumbs to set a little is a good idea.  I set them on a wire rack.

Heat a couple of tablespoons of butter and a couple of tablespoons of vegetable oil in a large frying pan over medium heat.  The butter will add flavor to the breading, and the oil raises the smoke point of the butter, so you can cook at a little higher temperature.  You want the chops to sizzle as soon as they hit the pan.  An easy way to make sure the pan is hot enough is to test a few breadcrumbs in the oil before you add the cutlets.  Schnitzel will cook in about two minutes on each side.  You want them nice and golden brown, but not overcooked.  Overcooked pork can be very dry -- particularly the loin, which is very low fat.

To add complexity to a very simple dish, I wanted a good German potato salad, which I had made before.  I prefer it to a mayonnaise based potato salad for its lightness and its vinegar tang.  I used little baby dutch yellow potatoes, just because I like their flavor and firmness, and their quick cooking time.  Any boiling potato will work, but baking potatoes are too crumbly for this salad.  The vegetables used in the potato salad vary among recipes, so I suggest using whatever you prefer, though a bit of onion is always in order.  I had a pretty little red bell pepper from the garden, a serrano pepper, and a bunch of green onions.  Perfect.
whatever vegetables you use, mince them fairly small

While the potatoes boil (or cook in the microwave, whichever method you prefer), slice two or three strips of bacon into quarter inch strips, and fry over medium low heat until crisp.  Remove the bacon from the pan, and add the vegetables to the bacon fat, cooking just until tender.
the vegetables are cooked just to tender crisp
so they retain a bit of body and a nice bright color

Once the vegetables are done, add a third of a cup of vinegar, and simmer to reduce a bit.  I used white balsamic vinegar.  I like its nice aroma and mellow flavor, but white wine vinegar or apple cider vinegar will work as well.  Avoid red or dark vinegars, which will stain the potatoes with an unappealing color.  Add in a teaspoon or so of salt, some freshly ground pepper, and some mustard seeds, or coarsely ground mustard seeds.  Slice the cooked potatoes into little rounds as soon as you can handle them.  You want them as hot as possible.  Add the dressing to the warm potatoes, throw in the crisp bacon, and add a handful of fresh herbs for brightness.  I had parsley and chives on hand, so that's what I used.
herbs add to the spicy aroma of the warm salad

The spicy warm salad was a great foil for the crunchy but simply prepared pork.  
a simple October dinner, ready in about 30 minutes
next time, I will pound the pork even thinner

Sunday, October 3, 2010

another take on a braise

Like many cooks before me, some years ago I came to understand that  cooking has very little to do with knowing lots of recipes, and a whole lot to do with understanding cooking techniques and the way flavors combine.  For instance, I know I prefer a richer, browner version of chicken and dumplings than most recipes produce, and I love the texture and flavors that onions and mushrooms bring to a braise.  So my version of chicken and dumplings is very similar in style to the Sunday beef braise I wrote about a few days ago, though a few critical changes makes the flavors distinctly different.

I use skinless, bone-in chicken thighs.  I am not a fan of chicken breasts in any preparation that is going to cook for any length of time, because the meat easily becomes dry and overcooked.
Just as with the beef braise, the chicken gets browned
in a little bit of fat

Here, I chose bacon fat because I had some on hand, and I wanted to add some of that smoky flavor to the braise, without adding bacon.  You can achieve the same effect by rendering some bacon, and adding it right to the braise if you like.  After the chicken is browned, it is removed from the pan, and quartered mushrooms and pearl onions are added to the fat to brown a little.

Here is the first significant departure from the beef braise -- I don't add garlic to this dish.  Once the onions and mushrooms have browned a little, stir in a couple of tablespoons of flour and cook it with the fat for a few minutes.  You can put it right on top of the vegetables -- no need to take them out of the pan.
The vegetable combination is the same here as in the 
beef braise, minus the significant amount of garlic

After the flour has cooked for two or three minutes, nestle the chicken back in.  Now for the second significant departure -- instead of red wine, I use a dark beer in this preparation.   I like a porter for its smooth, caramel flavor and deep brown color, but any dark beer you like will do.  If you don't like dark beer, then use a lighter colored beer, but be sure it has some body and flavor.  No MGD 64 for this preparation.
no need for the beer to be flat -- 
all that carbonation will cook away during the braise

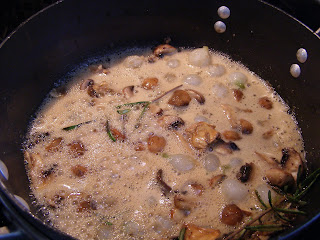
As you can see, I added a few sprigs of rosemary.  I also added two cups of chicken stock.  If you have home made, marvelous.  If not, watch your sodium content in commercial broth, as the sauce will reduce quite a bit.  At this point, I also added about a teaspoon of salt and freshly grated black pepper.  You can continue to simmer this on top of the stove, but I prefer to put it, uncovered, in a 325 oven.  Leave it there for about twenty minutes, while preparing the dumplings.  This time, I made a dumpling similar to a recipe I saw in a Jamie Oliver book.
a food processor is a great way to make biscuit dough

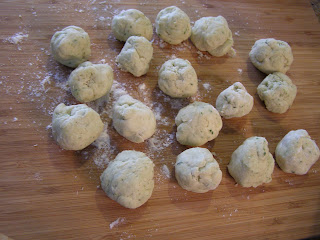
One and a half cups of flour, a teaspoon and a half of baking powder, a teaspoon of  salt and about a teaspoon of freshly grate nutmeg, and six tablespoons of cold butter go into the processor bowl (or you can combine them in a bowl and cut in the butter with a pastry cutter, a fork or your fingers.)  I added a couple of tablespoons of chives because I still have them in the garden, but thyme, parsley, or tarragon would work just as well.  After the butter is thoroughly cut into the flour, take about 3/4 cup of milk, buttermilk, or cream, and stream it into the dry ingrediants, using just enough to get a fairly stiff dough.  Check for consistency as soon as the dough begins to form a ball.
the biscuit dough is rolled into ping pong-sized balls

Put the rolled dough back into the refrigerator for a few minutes to chill the butter.  Take a look at your braise.  It should be beginning to have some body in the sauce, and be a rich brown color.
the braise is beginning to color and thicken a bit -- 
now is the time to taste and adjust your salt and pepper

You don't want the sauce to cook down too much, because the dumplings will absorb quite a bit of liquid.  If it has reduced too far, add some more chicken stock or a bit of water to loosen things up.  That odd looking shape at the bottom of the picture above is a chunk of frozen chicken broth I added to thin things out a bit.  I love the rich color of this braise.  The dumplings are simply dotted around the top of the pot, and the whole thing is returned to the oven for 45 minutes, or until the dumplings are brown and crisp on top.  You can speed the process a bit by upping the temperature of the oven to 375 or so.

the finished product -- simply serve one or two
of the chicken thighs along with some sauce, veggies, and dumplings

This is a rich and homey dish, but I did find it to be a bit filling.  I think the next time I make it, I will go with a different style of dumpling, or maybe even serve it over noodles or spaetzle.  The point is, once you understand the elements of a braise, and tastes that you enjoy together, you will be able to alter dishes with confidence, or to even create them from whatever you have on hand.  It's a very useful skill to have, and certainly one worth practicing, so recipes will become an inspiration rather than a mandate.