Friday, May 28, 2010

you little scamp

Something easy, garlicky, and good for a Friday night:  shrimp scampi.  It cooks literally in the time it takes to boil the noodles, and the prep work before hand takes just a few minutes.  I used five small cloves of garlic, sliced thin on my mandolin, for the starting point.  You can use more or less, depending on your taste.  I use my full sized mandolin, but a little hand held job will do the trick for super thin slicing just as well, for a third the price, or less.  Then there's the quick work of peeling the shrimp, deveining them (or thawing out a dozen or so frozen, uncooked shrimp), chopping up a bit of optional broccoli for color and flavor, mincing a handful of parsley, and assembling a pinch of salt (careful, the shrimp can be salty), teaspoon of pepper, and a teaspoon of red pepper flakes.  Then zest a lemon (I used a meyer lemon) into a measuring cup and squeeze in the juice.  Round that up to about a half a cup with a splash of white wine.  While you are doing that, bring a big pot of water to boil.
an easy mise en place for scampi with broccoli

Throw the pasta in the boiling water.  I like linguine with this dish, but I didn't have any on hand, so tonight I used spaghetti.  Toss about two tablespoons each of butter and olive oil in a pan over medium low heat, when the butter has melted and begins to bubble, toss in the garlic.  Once it starts to sizzle and turn a very pale yellow, throw in the lemon/wine mixture and the spices, and turn the heat up to medium.  
the garlic sauce will start to thicken up in just a couple of minutes

 toss in the shrimp and the broccoli

Cook just until the shrimp are pink and the broccoli is crisp/tender, about five minutes.  Drain the pasta, and put it back in the pot, and add the sauce.  Toss the mixture a bit to combine, and serve with a nice crisp salad, a bit of warm bread if you like (great for sopping up the last of the buttery sauce), and a big fat chardonnay.
sprinkle on the parsley and you are good to go

A beautiful, flavorful meal for a relaxing beginning to the Memorial day weekend.

Sunday, May 23, 2010

easy hollandaise

I'm not sure why hollandaise got its bad rap as being a touchy and difficult sauce that curdles and breaks and won't hold long.  Because none of it has to be true.  For instance, the most hazardous task is thickening the egg yolks over heat, which invites scrambled eggs in a heartbeat.  Then there is the tedious task of whisking melted butter into the thickened yolks a few drops at a time.  All unnecessary poppycock.  A double boiler isn't even necessary, though I like to use a pyrex bowl set over simmering water, because it does reduce the risk of curdling, and it is easy to keep the eggs moving in a mixing bowl with a whisk.  Two egg yolks and three tablespoons of butter make enough hollandaise for two to three people.  Just cut the butter up a bit, and dump the egg yolks, the butter, the juice of half a lemon, a pinch of salt and a little cayenne right in the bowl, and set it over the simmering water. the chill of the butter and the addition of the lemon juice easily regulate the temperature of the egg yolks, and ward off the dreaded curdled eggs.
hollandaise done the easy way

Now, you do have to pay attention, for about all of five minutes, to get this right.  But I have found that the sauce will hold perfectly well for hours, so there is no reason not to just make this ahead of any other preparations you have to do.  With the water at a steady simmer, simply whisk the sauce until the butter melts, and the sauce is a nice creamy consistency.  Using a hot pad, lift the bowl from the pan, and set it on the counter.  Continue to whisk until the bowl is no longer hot to the touch.
five or six minutes of whisking yields a velvety, lemon-scented sauce

Eggs benedict is a great way to put that lovely sauce to use.  We like ours with bacon and maybe a little sauteed spinach.  The secret to crisp, evenly cooked bacon is going low and slow.  I have found that an electric skillet set at about 350 does a superior job.  It does take some time to cook -- maybe 20 to 30 minutes -- so I start the bacon first.  It requires very little attention.  Just turn it once or twice.
bacon is properly cooked when tiny foam bubbles appear on the surface

I poach the eggs right in the water I simmered for the hollandaise.  Just add a teaspoon of vinegar, which will help the eggs hold their shape.  The fresher the eggs, the better, as the white thins as it ages, and loses its tendency to cling to the yolk.  I like a poached egg to have a creamy but still runny yolk.  Jim likes his yolk set up a little more.  So, after about five minutes, I just take out the last egg put in the water,  lifting it out with a slotted spoon and resting the spoon on a kitchen towel to drain the water.  By the time I have that settled on a toasted english muffin, I can retrieve his eggs, and they are slightly more cooked.

While the eggs are poaching, I plop the bowl of hollandaise back over the pan of simmering water, and whisk while reheating it.  It takes just a minute or two, while the eggs are poaching merrily away in the pan.
a delicious and easy treat

With the simplified cooking method, hollandaise doesn't have to be just a restaurant treat.  And it doesn't have to be made from some mix loaded with stabilizers and artificial flavors.  Give it a try!

Friday, May 21, 2010

and now for something on the lighter side

Banh mi are little Vietnamese sandwiches of spicy pickled vegetables and meat.  I think usually pork.  At least that is what I have run into around here.  The version I did tonight involves grilled pork tenderloin rubbed with aromatic five spice powder.  Or actually, in this case,  China Moon Ten spice powder from the China Moon cookbook.  Oh, so worth the extra effort...

The spicy slaw is a combination of carrot, diakon radish, sirracha, rice vinegar, sugar, and fish sauce.  At the last minute, I stirred in some napa cabbage and cilantro.
a little serrated peeler make beautiful shreds of carrot and daikon

for about 2/3 of a daikon and three carrots, I used 1/2 cup of rice vinegar, 3 TBS of sugar, a TBS of sirracha (Vietnamese hot sauce available in most groceries) and 1 TBS of fish sauce.  I let that macerate all afternoon, then added in  the cabbage and cilantro before serving.  If you don't want too much spice, just back off of the sirracha a bit.
a nice, crunchy, spicy slaw

From there, it's just 20 minutes or so on the grill for the pork tenderloin, followed by a five minute rest, while the split rolls are toasted and spread with a little mayo.  The authentic rolls are made with both wheat and rice flour, but any baguette will do.  Today, I used a whole grain baguette.  It's a simple, spicy, tasty sandwich, simply served with a little more slaw on the side for a nice helping of crunchy veggies and tender meat.
tender, aromatic pork and spicy veggies.  A winning combo.

big mac attack

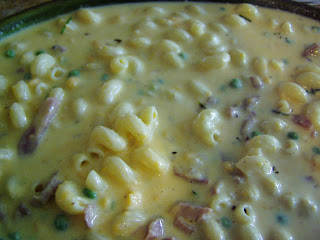
No, I was not craving a fast food hamburger.  When I have a mac attack, the object of my desire is a plate of creamy, crispy mac 'n cheese.  There are many schools of thought on the proper preparation of a good mac 'n cheese, and there are many tasty variations, from creamy stove top varieties, to soft and almost souffle like Southern versions made with egg custards.  My preferences tend to something in the middle of those two.  I like the smooth richness and crunch of a baked dish, covered with toasty garlic parmesan bread crumbs.  But I also like my pasta still nice and al dente.  To that end, I have discovered my favorite noodle for this dish to be the whimsical cavatappi noodles, sold here in the grocery store as "Corkscrews."
the thickness and ridges on the corkscrew noodles
makes it easier to keep them al dente in a baked dish

I cook them just shy of al dente, to a stage that they have quite a bite of "chew" left in them, then drain them and allow them to cool.  I don't rinse them, so some of their residual starch will enrich the sauce.

For the sauce, I like to start with a bechamel, the combination of equal parts flour and butter, cooked to a pale golden color, then combined with.... cream.  Yes, heavy cream, which on its own would make for a cloyingly rich sauce.  So, why do I use it?  Because of it's stability under heat.  Sauces made with milk can split and curdle.  So, the trick is to thin the bechamel with twice as much water or broth as cream.  So, if I use 1 cup of cream, I use two cups of water.  You can use broth, if you want that additional flavor, but I prefer water for its neutral flavor, that allows the cheese to be the star.

As for the cheeses, let your imagination be your guide.  I had some mild "hoop" cheese I wanted to use, which melts nicely to make a creamy sauce.  Then I kicked the flavor up by adding a very sharp aged cheddar.  But in the past I have used fontina, raclette, or monteray jack for creaminess, and anything from comte, blue cheese, aged jack, or gruyere for flavor.  There really are no limits to the combinations of cheeses.  Just let your taste buds be your guide, and be sure to include a cheese that melts smoothly to maintain that creamy mouth feel. I like to keep the sauce on the thin side, because it will thicken up as moisture evaporates, and the pasta absorbs some of the moisture and exudes starch.
I seasoned this sauce with a bit of thyme from the garden,
nutmeg, salt, and freshly ground pepper

fold in your noodles and any other additions you'd like.
here, it was ham and peas, for a main dish

You can simply bake that in the oven for about 30 minutes (40 minutes if you made this ahead and chilled it in the fridge, which works great), but I like the finishing touch of a crunchy topping.  So about half way through the baking time, I add a layer of crunchy, toasty breadcrumbs.  I like the zing of garlic, but I don't want its raw bite, so a quick secret for mellowing garlic is to pop your whole, unpeeled cloves in the microwave on high for 15 seconds or so.  It steams them just enough to take the edge off.  Since the crumbs freeze beautifully, I make a whole loaf's worth at a time.  Last night I used a loaf of asiago cheese bread, but any sturdy, chewy bread will do.  In the food processor, I pulverized chunks of the bread along with the garlic and about a a cup and a half of shredded parmesan.  I spread that mixture on a cookie sheet, and toasted them to a light golden brown.  The leftovers can just be popped into a freezer bag and frozen.  They are ready as a crunchy topping on vegetables or casseroles at a moments notice.
the mac 'n cheese with its crunchy topping

servred with a simple salad, this is a dish to
satisfy any real mac attack

Wednesday, May 12, 2010

the first basil of the season

I love that fresh basil is available year round in most grocery stores, and I use it all year long in everything from pesto to Thai stir fries, but I must admit, there is something very satisfying about plucking my first basil leaves from my own herb garden.
my little herb garden.  There's basil, bay, rosemary, onions, garlic,
savory, thyme, parsley, sage, lemongrass, oregano, marjoram, and chives

So, in celebration of that first "plucking" I decided to make some herb and cheese manicotti.  When you are making manicotti, or canneloni, forget those silly dried tubes that require pre-cooking and are slippery and awkward to fill.  Instead, opt for fresh pasta, if you have the time to make it, or if you don't, a box of "no boil" lasagna noodles.  My favorite is made by Barilla, and a simple 10 minute soak in warm water yields tender, perfectly sized rectangles of pasta that cook up tasting remarkably like home made pasta.

With manicotti,  a simple sauce with clean flavors will really set off the more complex flavors of the filling.  And there is no simpler a sauce than this classic Italian tomato sauce.  It is nothing more than garlic, tomatoes, salt, and pepper.  

Peel and slice about five medium cloves of garlic, as thin as you can get them.  One of those cheap little hand held mandolines does a fantastic and very quick job of this.  I'm not sure why, but the slices just seem to work better.  I think it's the way they just seem to melt into the sauce.  But if you are feeling lazy or you're in a hurry, this sauce would be delicious made with a couple of tablespoons of the jarred garlic as well.

Heat 3 tablespoons of olive oil in a pot over medium heat, until just shimmering.  While that is coming up to temp, open either two 14 ounce cans of diced tomatoes, or one 32 ounce can.  My favorite is the Muir Glen Fire-roasted tomatoes, for their bright tomato flavor and medium bodied puree.  Have them at-the-ready, by the pan on the stove.

Now, here is the only fussy part, and it takes just about 3 minutes.  Put the garlic in the shimmering oil, and cook it until it is just barely golden.
barely golden, thin slices of garlic, poaching in olive oil

As soon as they begin to color, dump in the tomatoes, and reduce the heat to medium low.  Add about a teaspoon and a half of salt, and several grinds of pepper, and simmer for about 20 minutes.  You will have a lovely sauce, tasting of sweet tomato and mellow garlic.  Simple, delicious, great on pasta, raviolis, or manicotti, and easy to freeze, so don't be afraid to make a big batch and put a little away for a rainy day.

While the sauce simmers, put the noodles (about 2 or 3 per person is good) in a bowl of warm water to soak.  A food processor makes quick work of the filling, but it is easy to make by hand, too.  For ten manicottis, I use a 32 ounce container of ricotta (I prefer the whole milk ricotta, but the part skim will work), 6 ounces of Parmesan cheese (please buy good parm in a block), about 2 cups (packed in) of fresh basil leaves, and 3 cups of (packed in) fresh Italian parsley leaves.   Put the parm into the food processor, and chop it until there are no large chunks left.  Add the ricotta, 3 teaspoons of nutmeg, a teaspoon of salt, and several grates of fresh pepper, and pulse to combine.  On top of that mixture, add in your herbs.
the filling, ready for the final mixing

Pulse in the herbs, until everything is just combined.  Drain your noodles, and spread them out on a towel, and dab the water off of the top of the noodles with another towel.  Set the oven to 375, and start assembling the dish.  Now, here is a trick I learned from Marcella Hazan.  Instead of putting a big lump of filling in the center of the noodle and wrapping it up, spread the filling over the noodle, and roll it up like a bedroll.  It keeps the filling lighter, and gives you a better proportion of noodle to filling in every bite.
place a dollop of filling on each noodle, spread it out, and roll.
place the rolls in your pan, over a ladle-full of the sauce

I make ten manicotti at a time.  Five for Jim and me to eat, and five for a second pan for the freezer.  Once you have them in the pan, top them with more sauce, and some grated mozzarella, and a little parm or gruyere, if you'd like.

pop this in the oven for about 20 minutes, or until the cheese is brown
and the sauce is bubbling

I think one of the reasons I love dishes like this is because, while it bakes in the oven, I can pour a glass of wine, clean up the kitchen at a leisurely pace, and make a little garlic toast and a simple salad.  After dinner, there is nothing left to do but pop the plates in the dishwasher and go sit on the deck.

The finished dish, sprinkled with a few chopped herbs

A delicious and satisfying dish.


Monday, May 3, 2010

the power of flavorful foods in hard times

Some of you may have read that my mom broke her hip and had replacement surgery at the end of March.  Well, last Thursday, she fell again, and this time she fractured her pelvis.  There isn't much they can do about it.  It's just a long and painful recovery, so today, I moved her into a skilled nursing home for what we hope will be a finite recovery time of one month.

So, under those circumstances, and with the tech writing stuff in high gear, I have been missing in action for about a week.  I have been, once again, living on odds and ends in the fridge, and whatever fast food I can find that isn't too awful.  So, needless to say, I was hungry tonight.  And tired, and in no mood to assemble anything but easy, soul satisfying food that didn't require a trip to the store.  So, it was time for another door knock dinner, and it was time to use some of the produce I had purchased last week, for dinners that never happened when all hell broke loose.

another advantage of a nice big cutting board -- mise en place

I had a small head of orange cauliflower (love the color), a bunch of green onions, a small bunch of rainbow chard, and some garlic in the fridge.  In the freezer I had shrimp, and both ginger and lemongrass (which freeze beautifully and last forever), and in the pantry both basmati rice and coconut milk.

Indian food is often comfort food in my house.  It's fast, satisfying, packs a little bit of spice and heat, and lots of veggies.  So, I sauteed the cauliflower with a bit of red chile paste, some garam masala, the ginger, garlic, and lemon grass.  Then, once that had taken on a little color, and the spice had infused the cauliflower, I added the green onions and chard.
cauliflower, chard, aromatics and spices wilting in the pan.

From there it was as simple as the addition of a teaspoon of salt, half a can of coconut milk, and ten or so thawed frozen shrimp. Heat on low, I let those shrimp cook very slowly, and soak up some of the flavor of the spices while the rice cooked.  Start to finish, about 40 minutes to the table.  Could have done it in 30, if I had felt like hustling, but this dinner was about slowing down, sipping a glass of wine, and putting something soul nourishing on the table.

think of it as a cross between Southern and Indian

I have no idea if there is anything even remotely like this dish in India.  But it combines great, nutritious, colorful South Carolina shrimp and greens, the texture and spice absorbing richness of cauliflower, and the exotic spice flavors of India into one easy, satisfying dish.

I can only hope this is an omen of better days to come.