Wednesday, September 29, 2010

gnocchi redux

On to the second style of gnocchi.  This time, ricotta and spinach gnocchi -- also known as gnudi, which literally means "naked" because they resemble the filling for a ravioli, without the pasta dough.  Research lead me to several different methods for making the gnocchi, and in the end, I combined a couple of different recipes, primarily one from Cook's Illustrated, and one from The Italian Cookng Encyclopedia.  From the ICE, I used the addition of spinach and multiple herbs.  From CI, I used the addition of toasted bread crumbs.  In the end, I used 16 ounces of ricotta, drained in a cheese-cloth-lined seive for a couple of hours in the fridge, a 9 ounce bag of spinach, half a cup of toasted bread crumbs, about 2/3 cup of flour, a cup of parmesan,  salt, pepper, grated nutmeg, a few leaves of basil, four cloves of garlic, and a handful of Italian parsley.  I tamed the harsh garlic bite by microwaving the four cloves for 15 seconds on high.
bread crumbs, parm, herbs and sweated garlic
go in a processor to be ground fine
The steamed, and thoroughly dry spinach are then added 
with an egg, and chopped fine

Once that is all combined, add in a couple of pinches of salt, a few grates of nutmeg, and a few grinds of pepper.  Combine that with the drained ricotta, and about 2/3 cup of flour.  Park that all in the fridge for at least 30 minutes.

My dough was still pretty wet, but I decided to roll it out in plenty of flour, rather than add more flour to the dough itself.  The decision paid off, in light, airy gnocchi.
ricotta and flour, incorporated by hand

The sticky dough is rolled into ropes, in plenty of flour
then cut into little squares and rested in a flour dusted tray

With all of that flavor in the dumplings, I decided on a simple tomato sauce, which I have talked about here before.  Just garlic, oil, tomato paste, tomatoes,salt and pepper.

Thankfully, the dumplings behaved just as they were supposed to, sinking to the bottom of a pan of simmering water, then floating to the surface after a couple of minutes.  I scooped them out, drained them on a towel, and nestled them on a pool of the sauce.  Garnished with a bit of parm and a sprinkling of fresh parsley, they were as pretty to look at as they were good to eat.

phase two of the gnocchi experiment

Sunday, September 26, 2010

Sunday beef braise

A silky smooth concentration of broth and wine enrobing chunks of tender, melting beef, studded with glistening pearl onions and meaty sauteed mushrooms.  Hmmmm.... Sounds like a Sunday supper dish to me.

It's my riff on Boeuf Bourginon.  And while not classical, I think it's easier, less fussy, with straight forward flavors.  And it starts with the beef.
a shoulder roast or a pot roast is perfect for this dish

I like to buy a whole roast and cut it into about two inch square cuts.  Stew meat is more expensive, and in my opinion, cut in too small pieces.  I like having a decent-sized hunk of meat that yields to the side of a fork.  While it is not completely necessary, browning the meat first in a couple of tablespoons of oil creates beautiful brown bits on the bottom of the pan, and more attractive meat in the end.
brown right in the pan you are going to braise in,
here an enameled cast iron pot
Once the meat is browned on all sides, remove it from the pan, and stir a couple of tablespoon of flour into the hot fat.  I like Wondra flour for this, because it is easy to pour, quickly absorbs the fat and begins to color.  Once it begins to color, for a couple pounds of meat, deglaze the pan with half of a bottle of drinkable red wine.  It doesn't have to be expensive, just something fairly dry, with a decent flavor.  Scrape up all of those brown goodies in the bottom of the pan, and add in a couple of cups of beef stock.  Home made is marvelous, but store bought will do.  Use a lower sodium version of the store bought, because the broth is going to concentrate, and saltiness can be a problem.  Add your beef back in, continuing to simmer the mixture on the top of the stove.

Now comes the aromatics.  Just cut up an onion or a couple of large shallots into quarters, peel and all.  Same thing with 8-10 cloves of garlic.  Just give them a whack with a knife and toss them in, no fussing with peels -- the sauce will be strained before serving.  Add about six sprigs of thyme (a heaping tablespoon of dry), a couple of bay leaves, and six or so whole peppercorns.  A typical boeuf bourginon has carrots as well.  I don't add them because I don't care for the grassy sweetness they bring to the party, but you make your own call on that.
The braise is now ready for the oven

The pot gets covered, and slid into a 300 degree oven.  Or even a 275 oven, if you intend to let it cook longer than 2 1/2 hours.  Or a crock pot, for that matter, if you want to leave it in there all day, though if cooked in a crock pot, the sauce will have to reduced a bit on the stove before serving, because not enough moisture will evaporate during the cooking time.  Now, tidy up the kitchen and go practice your tennis swing, or start that novel you always wanted to write.  Lori, you go take the dogs on a walkabout on the ranch.

About thirty minutes before you are going to serve, pull the braise out of the oven, and check the body of the sauce.  It should be silky and unctuous enough to coat the back of a spoon.  If it is too thin, stir the meat around, and leave off the pan lid.  If it is too evaporated, thin it a bit with a little water.  Yes, water.  It's neutral, and basically what evaporated away in the first place.  Remove the meat from the pan, strain the sauce through a strainer, pressing on the aromatics to extract all of that goodness, and return the meat and sauce to the pan.

Now come the pearl onions and the mushrooms.  You can blanch and peel those pesky little onions from the produce isle if you want, but I am a huge fan of the frozen pearl onions.   They are sweet, perfectly frozen at the peak of flavor, and they require nothing more complicated than opening a bag. If your local grocer doesn't carry them, stomp your foot and pitch a (polite) fit at the service desk.  It works.  If you wish, you can just dump the frozen nuggets straight in the pot.  However, a quick saute in a little butter gives you...
glistening, golden pearl onions in about 5 minutes over medium heat

sauteing the mushrooms is a must --
they need to brown and give up much of their moisture

Once the onions and mushrooms are added into the braise, warm for a few minutes, either on  the stove top or in the oven, then taste and adjust the seasonings for both salt and pepper.
finished  braise


If you are familiar with Boeuf Bourginon, you may have noticed that I didn't include the lardons of bacon or fat back.  I don't care for the texture of pork fat that has stewed in liquid, but I have been known, if I have some on hand, to brown the beef in bacon fat for that salty, smoky flavor.  I suppose the point is, don't be afraid to play with your food.  Figure out what you like and what you don't like, and adjust accordingly.  One thing missing in this dish that I do like is the sour cream element of a stroganoff.  So, I choose to serve this dish ringed with traditional egg noodles, tossed in a mixture of sour cream or creme fresh, grated parmesan, and minced parsley.  The cream in the noodles oozes into the sauce of the braise, and the noodles soak it all in.  This is a favorite winter Sunday supper dish in our house.  But, hey, if you prefer rice, or boiled potatoes,  or even just a crusty loaf of bread, just go for it!
and not complete without a complimentary glass of red

up close -- the sour cream melts into the very lightest 
of sauces on the hot noodles

the gnocchi files

I love gnocchi in the same way I love chile relleno.  Which means, most of the time, I don't love it at all.  Once you have a superb, ethereal, perfectly cooked and sauced one,  you will endure hundreds of clunky, leaden and poorly made examples in search of that next perfect specimen.  I haven't had a good gnocchi for some time, and that got me mulling over my options for making them at home.  There are many versions of gnocchi, but the most common is the potato gnocchi, so I started there.  Tradtional recipes call for potatoes boiled until tender, but not falling apart, eggs, salt, nutmeg (usually), a little pepper, and flour.  The idea is to incorporate just enough flour into the potato mixture to create a dough, but not so much as to create a leaden little lump.  My experiments years ago lead me to a recipe that said that gnocchi made with eggs would never be light.  To bake the potatoes to reduce the overall moisture (that made sense -- more moisture=more flour) and add only salt and as much flour as necessary.  Well, I did that, and I had problems with the little dumplings absorbing too much water and coming apart.

Marcella Hazan says that eggs make for heavy gnocchi as well, and since she is the godmother of Italian cooking, I paid attention.  Then, while googling around a bit, I came upon a Tyler Florence recipe that added just one egg white to his recipe, and also added a half a teaspoon of baking powder.  Intriguing!  I'm sure that baking powder -- even such a small amount, would be sheer heresy in an Italian kitchen, but I am all about the best results, and I certainly don't mind turning a recipe on its ear, if it means I might get something all together better.

Just out of a quest for airiness, I even whipped that egg white to soft peaks before incorporating it, but I imagine that the dough is handled too much for the air in the egg to be retained.
baked potatoes are pressed through
a potato ricer while still hot

If the potatoes are riced while still hot, they will give off additional moisture in the form of steam.  To three baking potatoes, I added a half a teaspoon of baking powder, a teaspoon of salt, a teaspoon of freshly ground white pepper, half a teaspoon of freshly grated nutmeg, and half a cup of flour.  Once I had combined that mixture, I fold in the egg white beaten to soft peaks, and began incorporating more flour.  I added another cup, for a total of a cup and a half.

The reaction of the baking powder in the dough was obvious -- it was soft, and pliable, with tiny pockets of air.  So far, so good.
the soft dough is rolled into ropes, cut into little rectangles,
then rolled across the tines of a fork, and rested on a floured tray

You can simply cut the dough into squares, but the step of rolling each little dumpling over the tines of a fork creates ridges, which makes little grooves for the sauce to cling to.  
three large potatoes made a lot of gnocchi, 
so I froze half of them for later use by freezing them 
right on the tray, then bagging them

To test the gnocchi for lightness and their ability to stay together (enough flour) I cooked a couple of them in a little pan of simmering water.  Gnocchi are cooked in water just at a simmer -- a hard boil would increase the risk of the gnocchi breaking apart.  After a couple of minutes, the gnocchi floated to the surface of the water, just as they are supposed to.  I let them simmer a few seconds more, then lifted them out of the water and drained them.  Verdict?  Impossibly light little morsels of potato dumpling.  However, I could detect a slightly metallic tang from the baking powder in the background.  But, I thought that with a flavorful sauce that would probably disappear, at least to my pallet.

Because the first time I had really well-made gnocchi, they were sauced in a three cheese sauce, I decided to replicate that with a sauce made of cream, fresh tarragon, nutmeg, and little salt and white pepper simmered together for a minute.  To that, I added a bit of Maytag blue, marscapone, and parmesan.  The result was a rich, flavorful sauce that masked the background flavor of the baking powder completely.  Though it was a bit rich -- too rich for a main course.  Served as a side to a grilled steak and some sauteed veggies, it was delicious.
little pillows of creamy goodness, garnished with
a little shaved parmesan

I have a little of the lobster sauce from mom's birthday left over in the freezer.  I think that will pair perfectly with those frozen gnocchi for a quick and elegant Friday night supper.

And so begins the gnocchi experiment.  Next up, some time in the next week, is to try my hand at the less traditional spinach and ricotta gnocchi.  Over the next month or so, I will work my way through a few different varieties of gnocchi, just to see what we prefer. 

Friday, September 24, 2010

let's eat a fajita

When I go out for Tex-Mex, fajitas are rarely on the agenda for me.  Not because I don't like them -- I love fajitas -- but because they are just too easy to do at home.  I'm usually a skirt steak fan, but tonight I had a couple of chicken breasts to use, so chicken fajitas were on the menu. 

I like to marninade the meat, though it isn't necessary.  My go-to marinade for fajitas (for a couple of boneless, skinless breasts or a pound of skirt steak) is the zest and juice of a lime and an orange, a couple of cloves of garlic, a canned chipotle pepper along with a bit of the adobo sauce from the can, a glug of oil, and a handful of fresh cilantro leaves, all whirred up in the blender for a minute, along with salt to taste, then poured over the meat and refrigerated.  As I said, unnecessary for perfectly good fajitas, but it does bring some wonderful flavors to the party.  I am especially fond of the back notes of the orange zest with the chipolte chile.

Fajitas are a wonderful "do-it-yourself" sort of dinner, with endless possibilities for simplicity or extravagance.  I like to keep it simple when it is just the two of us -- just grilled meat and veggies, a little salsa, maybe a sprinkling of cheddar, and warm tortillas.  I even had store bought salsa in the fridge, but, oops, it was past its prime.  No problem.  I had a basket of cherry tomatoes, some fresh garlic, a couple of green onions, a hot pepper from the garden, and a sweet pepper.  Salsa was minutes away.
 I roasted the tomatoes, a shallot, a couple cloves
of garlic on a hot griddle.  I also
roasted some hatch chiles I had in the fridge.
One was destined for the salsa, the others for the freezer

The tomatoes, a hot chile, a hatch chile, garlic, tomatoes, a grilled shallot, a couple of green onions, a glug of oil, the juice of half a lime, and some salt went into the food processor.
just a few pulses makes instant salsa

Once the salsa was pureed I stirred in a handful of minced cilantro.  Then it was back on the griddle with the marinated chicken, and sliced onion and red bell pepper.  I prefer the sweetness of the red bells, but certainly use green if you prefer their grassy flavor.
The marinade on the chunks of chicken creates a nice brown crust


The chicken take just 6--8 minutes to cook, depending on the size of the chunks.  Begin to take them off the grill as they feel fairly firm when you press on them.  Set them aside to rest while the peppers and onions continue to cook.  In a separate pan, begin to warm up some tortillas.  Store-bought are fine, but if you are feeling adventurous, I have an earlier post on making flour tortillas.

Once the chicken is rested -- about 5 minutes -- simply slice it into bite-sized pieces, and set it up for everyone to assemble their own.  My evening meal was simple, but you can add various cheeses, sour cream, guacamole, chopped cilantro, fresh onion, lettuce, tomato....

a simple and hardy meal of grilled chicken and vegetables
warm tortillas, and fresh salsa

Saturday, September 18, 2010

fall is for apples

Apples are a bit of a miracle fruit, with their crisp white flesh and their ability to store for long periods, but they are never better than they are in the fall.  And I especially enjoy them in savory dishes.  Which for me, usually means pork, because pork and apples are quite fond of hanging out together.  Last night, that meant that some bone-in pork chops were destined to meet up with some apple/sage dressing.  The dressing couldn't be easier.  For four pork chops, you start with one large apple, cored and cut into chunks, half a large onion, and a couple of stalks of celery, with the leaves on, if they are still there .  Fairly firm, sweet/tart apples are the best choice to include in a dressing.  Some good choices are Duchess, Cortland , McIntosh, Jazz, or even Granny Smith.
mise en place for the dressing -- chopped fresh sage, 
celery, onion, apple, and toasted bread

I had fresh sage in the garden, but if you don't have fresh sage, dried will do nicely.  The onion, apple, and celery need to be chopped.  A food processor will make quick work of that.
everything can just be cut into chunks and tossed in--
after a few pulses, you'll have a nice base of veggies
for your dressing

That mixture gets sauteed in  a couple tablespoons of butter, until it gives up a good bit of its moisture, and begins to color, just a bit.
veggie goodness

For the bread element of the dressing, I prefer a fairly hardy white bread, such as a boule, or french or italian loaf.  For four pork chops, use about three cups of cubed bread.  I toast the slices lightly, and leave the crusts on, because I like the slightly hardier texture of the crust -- if you don't, simply trim off the crusts before cubing the bread.  After the veggies are sauteed, the cubed, toasted bread can be stirred in, as well as a couple of tablespoons of fresh sage (or about half that much dried sage), and salt and pepper to taste.  Once the mixture has cooled, add an egg to bind, and moisten with chicken broth if it seems a little dry.  I like, at this point, to toss in a handful of chopped, toasted pecan pieces, but that is certainly optional.
cut a pocket in fat, bone-in chops, or sandwich the dressing
between two thinner chops

Once the chops are stuffed, brown them lightly on top of the stove, and slide them into a 350 oven for about twenty minutes to finish cooking.  The stuffing should reach an internal temperature of 165 degrees.  A quick pan sauce can be made with the drippings by adding a bit of chicken broth, maybe a bit of wine, and reducing by half, then stirring in a last minute tablespoon of butter, off the heat.
apple/sage stuffed chop with a side of sauteed veggies

Don't feel like going to all the trouble of making a dressing and stuffing the chops?  Then just slice up your apples and an onion, and saute them in the pan, right along with the pork chops.  set aside the meat and apple mixture, and make a pan sauce by reducing chicken broth.  A dollop of brandy and a spoonful of sour cream make a wonderful last minute addition for a very special sauce for a wonderful fall dish.


Here comes that mandolin again.  Last night, to accompany the chops, I used a mandolin to slice thin ribbons of zucchini, onion, and sweet red pepper.
the mandolin  makes particularly pretty ribbons 
of vegetable

Sauteed together in a knob of butter, with salt, pepper, lemon zest, and lemon juice, the fine ribbons of vegetables make a very pretty side dish.


Thursday, September 16, 2010

a perfect little party treat

I used to make stuffed mushrooms quite often, and I was recently reminded of them during a chance facebook encounter with an old friend.  They really are a nice treat, and I have stumbled on a way to transport them to parties with no slippery slides or spills.  This recipe is a riff on a Julia recipe.  If you use small to medium crimini mushrooms, a mini muffin pan is the perfect pan to cook them in.  Wipe clean and remove the stems of 24 mushrooms.  Chop the stems, along with a couple of medium shallots.  A food processor will make quick work of that.  Sautee shallots and stems in 2 tablespoons or so of butter, until they give up their moisture, and begin to brown.  As soon as they begin to color, turn off the heat, and grate in about a teaspoon of fresh nutmeg.  Add about a half a cup grated gruyere cheese, and stir in a cup or so of lump crab meat, a couple of big handfuls of fresh bread crumbs, and enough cream to moisten -- probably about a third of a cup.  Season to taste with salt and pepper.   If you have them, throw in a handful of chopped chives, or maybe a bit of chopped Italian parsley.  The mixture should hold together enough to go into the mushrooms.
filling for about ten mushrooms

If the mushrooms aren't too large, a mini muffin tin makes a great pan to cook the mushrooms in, preventing the little buggers from sliding around and tipping over.  Melt a couple of tablespoons of butter, and brush the mushroom caps, top and bottom.  Set them in the muffin tin (even if the caps set up a little on the top of the tin, as they bake, they will drop down into the pan) and fill each one with a generous spoonful of the filling.
once the mushrooms are filled, shave on some parmesan cheese

Preheat your oven to 425, and bake the mushrooms for about 20 to 25 minutes, or until the mushroom are soft, and the tops are nicely browned.  If you are taking them to a party, just cover the tin with foil, grab a nice plate to put them on, and you are off.  Just use a little knife to gently lift the mushrooms out of their little cup.
delightful little mouthfuls of mushroom and crab

I made these last night as a side dish for a grilled rib eye, and Jim was eating them like candy.  It was nice to remember a fun little treat from a great time in Lubbock, Texas.


Wednesday, September 15, 2010

meatball nirvana

Meatballs are a staple at our house.  Jim is a spaghetti carnivore, and I don't care for the texture of ground beef in spaghetti sauce.  So meatballs are the perfect solution, and I wanted a way to make the perfect meatball.  There are thousands of recipes out there, but after a little fiddling I found the combination that we like the best.  I have found that a very soft combination of meats, seasonings, spices, bread and milk make for a very tender meatball.

I use only pork for meatballs -- usually a combination of sweet and hot Italian sausage if I am not grinding my own meat.  Additionally, I add fennel seeds, red pepper flakes, and dried minced garlic; toasted and ground coursley in the spice grinder.  I also add dried shallots, salt, and pepper.  I find the dried garlic and shallot add a more subtle flavor to the meat than fresh.  If you can't find dried shallots, dried minced onion would work just fine.  I love Victoria Taylor dried shallots, and often find them in the gourmet foods at TJ Maxx. In the food processor I put two hardy slices of peasant bread and about a half a cup of milk and grind it to make a soft bread paste called a panade. 
panade  -- here made with cream instead of milk, 
because I had some on hand -- decadent!
To that, I add the spices, the meat, and about a cup of shredded Parmesan, and grind it to combine.  The result is a soft mixture that can be a little difficult to handle, but it results in a very tender meatball.  I do not add egg because, though it does help bind the meat, I think it slightly toughens the cooked meatball.  Because they are very soft, I have found it to be much easier to bake them instead of trying to brown them in a frying pan.  When forming the meatballs, wetting your hands down every couple of meatballs really helps keep the meat from sticking to your hands.
we like large meatballs, just slightly smaller than a tennis ball

Twenty minutes or so in a 450 degree oven will give you nice browned meatballs.  Baking them on a broiling pan allows some of the excess fat to drain away.
golden brown meatballs

For the sauce, I make a basic tomato sauce, which is sliced garlic that has been poached in olive oil until it is just barely golden, tomato paste, diced tomatoes, a pinch of red pepper flakes, salt and pepper.  I often have a store of that sitting in the freezer.  For spaghetti and meatballs, I usually add quartered crimini mushrooms, sauteed with minced shallot and sometimes a bit of red bell pepper; another big pinch of red pepper flakes, and a couple big pinches of oregano.
the browned meatballs are submerged in the sauce,
and everything is simmered together for 20 minutes or so

The result is a very hardy meal when served with a green salad and maybe a thin slice of garlic toast.  I have found a lower carb pasta I like called Dreamfields that is much lower in carbs and higher in fiber than traditional pasta, but still tastes like the real thing.  If you run across it in the grocery store, give it a try.
the end result garnished with shaved parm -- Jim's portion -- my portion was a 
bit more modest in size...

As you can see, I made quite a bit of sauce and several meatballs.  This freezes very well, and will heat up in the microwave in the time it takes to boil pasta.  Reheat on a lower heat to avoid exploding meatballs in your microwave.

Tuesday, September 14, 2010

who gives a fig?

now for that fig and goat cheese salad, which is a natural for this time of year, especially here in the Carolinas, where figs are available in abundance through the late summer and early fall.  This salad will work well with a variety of figs -- brown turkey, mission, karachi -- whatever variety you find fresh in store or the farmer's market.  The base for the salad is a classic flavor combination.  Fresh figs, walnuts, and goat cheese.  They are sublime together.
fig, walnut, and goat cheese salad

In this version, I toasted the walnuts in a skillet over medium heat, just until they were fragrant.  I quartered the figs, and laid them in the same hot skillet, just until they were slightly softened, and just beginning to caramelize.

The dressing couldn't be more simple.  I had some walnut oil on hand, so I used that along with some white balsamic vinegar I like for its mellow flavor. Any mild oil would work, like peanut oil or light olive oil.  I would avoid extra virgin, so the flavor doesn't overwhelm the other ingredients.  The recipe is roughly three parts oil to one part vinegar, along with about two teaspoons of dijon mustard, a minced shallot, salt and pepper.  All tossed into a screw top jar and given a vigorous shake, until it becomes slightly creamy in consistency.

I used arugula for the base, but this would be equally good over some butter lettuce, mache, mixed baby greens, or even tender-crisp steamed green beans.  I simply placed the lettuce in a bowl, crumbled on a small log of fresh goat cheese available in just about any supermarket, added the walnuts and the grilled figs, and tossed with just enough of the dressing to lightly coat everything.

The sweetness of the figs, the tang of the goat cheese and the vinegar, and the crunch of the toasted nuts are the perfect foil for one another.  And the lovely thing about all of those fresh figs, is that they can be frozen by just tossing them in a bag in the freezer.  When they thaw, they will be a bit mushier than a fresh fig, but they will have all of that fresh early fall flavor.  In the winter, try making the salad dressing in the blender, and add the flesh of a couple of thawed figs right into the dressing.

In the mean time, if you have an abundance of figs on hand, replicate this taste extravaganza by halving some figs, scooping out enough of the flesh to pack in a bit of goat cheese, top with a walnut half, and run them under the broiler just long enough to soften the cheese and lightly toast the nut.  Drizzle the warm fig halves with a bit of balsamic vinegar, and serve as an appetizer with cocktails.  They are beautiful, elegant, easy, and utterly delicious.

you only turn 80 once

My mom had her eightieth birthday this month, and we are a small family, so I had to find a way to make it a special occasion for her without all the fun of a big party.  My brother came out for a visit, and I needed to plan a special dinner for my mom, Steve, Jim and me.  So I decided to go all out with a dish I had seen her relish in a restaurant in the distant past.
lobster in Parmesan cream sauce over homemade parsley fettuccine.

Warning:  This is not for the faint of heart -- on either a caloric level or a prep work level.    It is a beautiful dish to look at as well as to eat, and it will make a grand entrance at any table.  Much of the prep can be done in advance, which is a blessing.  I will divide the work into 4 separate steps, which is what I did, to attempt to preserve my sanity.

I will start with the pasta, which is deceptively easy to do.  It can be made early in the morning, and rest peacefully on the counter (away from sources of moisture) under a tea towel for many hours.

the dough starts with two whole eggs, a tsp of salt, 
and two big handfuls of parsley leaves in a food processor
blend them long enough to chop the parsley up a bit


all purpose flour is added until you have a crumbly mixture

Gather that mixture into a ball, wrap it in plastic wrap, and let it rest while you straighten up a bit, clean the food processor, and set up your pasta rolling machine.  If you are a masochist, you can roll and cut the dough by hand.  I, however much I wish I were, am not channeling a little old Italian grandmother.

I divide that dough ball into thirds, cover two pieces, and begin kneading the other, which consists of flattening the ball until it will pass through the widest setting on the machine, and folding it in half and re-passing it through the widest setting until you have a smooth piece of dough with no holes in it that has the soft, non-sticky feeling of a piece of very soft leather.  You can work in a bit of flour if the dough is too soft and sticky to begin with.  I then knead the other two pieces, so I can do all of the stretching at once.

I have the pasta attachments for my KitchenAid, which has eight setting for thinness.  In this case, I wanted my fettuccine to have enough body to stand up to the substantial sauce, so I took the dough to the sixth setting, and then cut it.

as you can see, even at #6 setting, this is a very
fine dough -- you can see my fingers through it

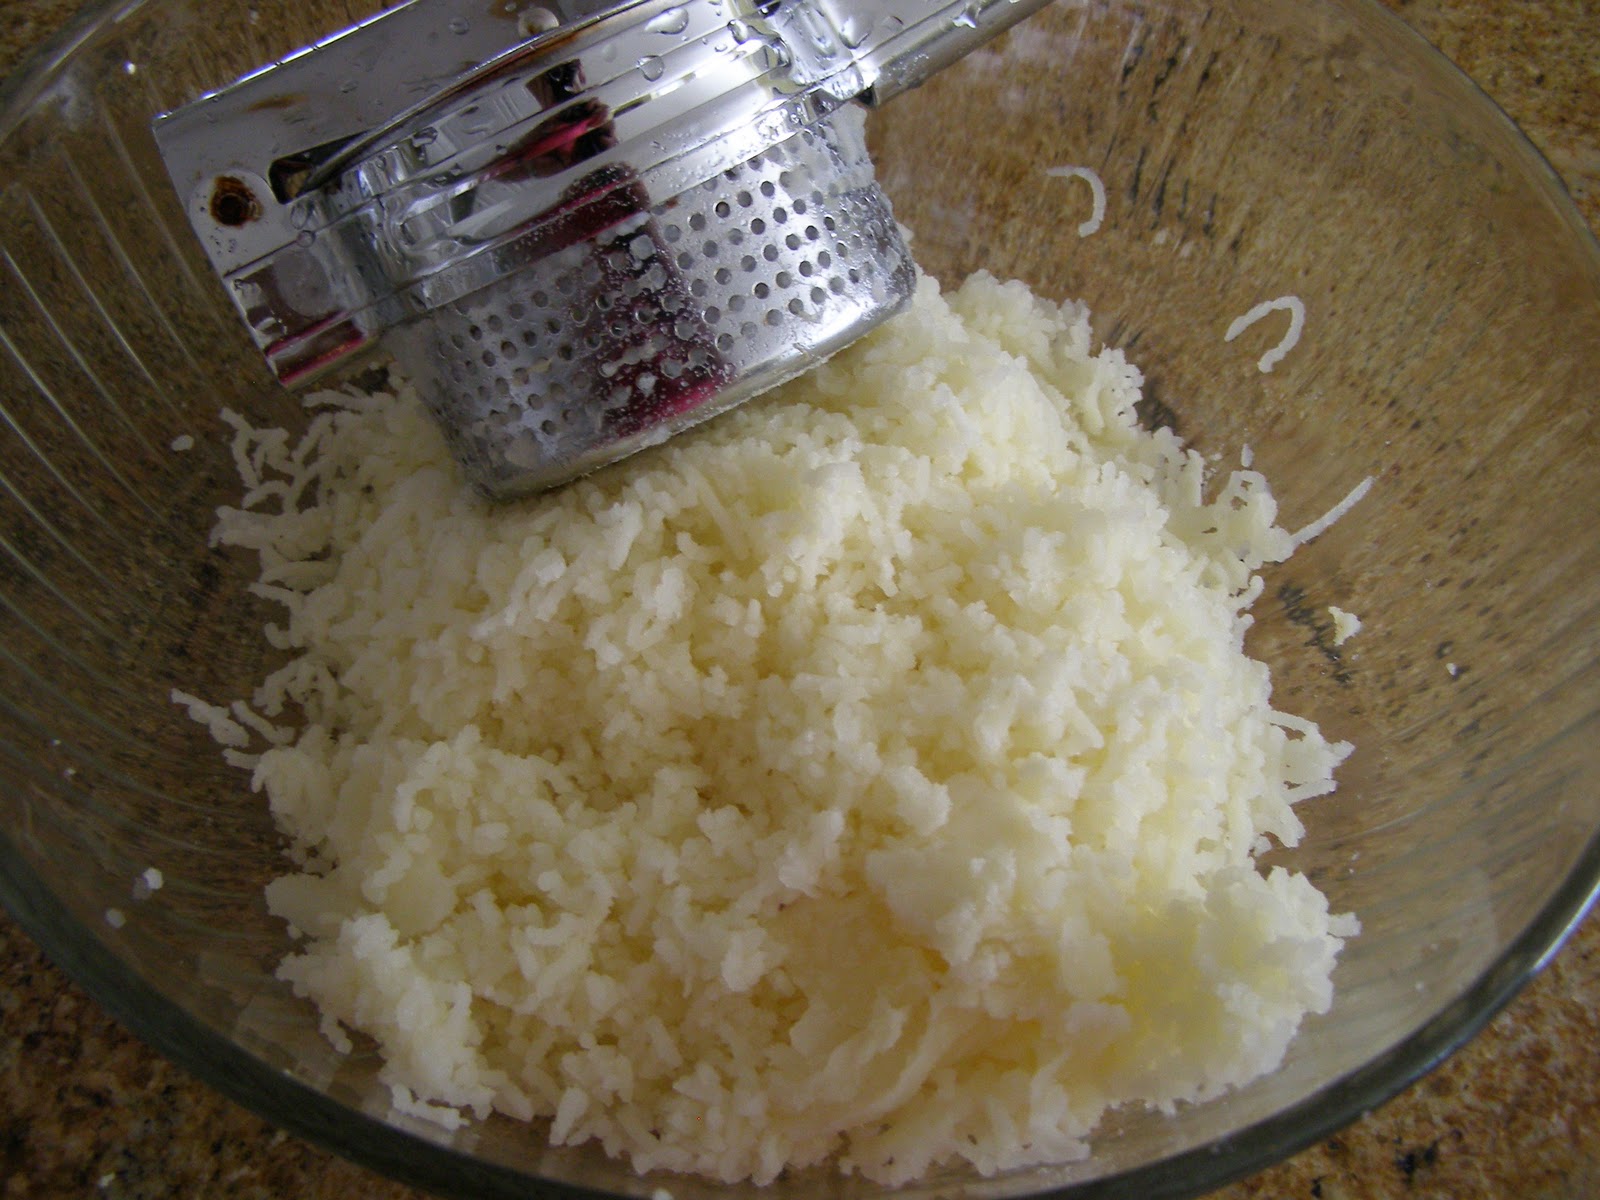
Once the noodles are cut, they can be tossed in a bit of flour.  I like rice flour because it will rinse away cleanly in the cooking water, without adding a bunch of gluten to the water.  I find rice flour at my local market, with the international foods.
toss the noodles in plenty of rice flour and set aside
under a towel -- just toss them occasionally to be sure 
they aren't sticking together


Once you toss the noodles into boiling water, the rice flour will rinse away, the green of the parsley will brighten and set, and you will be left with a vibrant, beautiful green noodle -- the perfect foil for the pale cream and the pink lobster to come.

On to the lobster.  To simplify things, I bought a couple of tails, so I wouldn't have to deal with cracking and picking whole lobsters.  When you cook a tail, or a whole lobster for that matter, the tails will curl.  While it didn't really matter for this particular dish, I thought I would pass on a little trick to prevent that, and make for a prettier presentation.
using a small wooden skewer, the type satay is cooked on,
simply insert it at the base of the tail up to the top, which will
prevent curling during cooking

The best way, in my opinion, to cook lobster, is to steam it.  It minimizes the chance of water-logging the meat, and it is much quicker and more efficient than giant pots of water that must be brought to the boil.  Simply put a couple of inches of water in the bottom of the pot, and add a steamer basket.  If you don't have one of those, which I don't, a colander large enough to hold the tails will work fine.  Plop in the tails, crank the heat to high, and cover the pot.  A couple of giant tails like these take just 12 minutes.  Smaller tails would take less time.  Err on the side of underdone, particularly if the meat will be heated further, as they will continue to cook, and overdone lobster is easily mistaken for chewing on chunks of rubber eraser.

things of beauty, deserving of a moment of reverence.


Lobster trivia -- early settlers in Maine had so many lobsters wash up during storms, that they shoveled them off the beach, and fed them to the pigs.  The lobsters were considered not fit for human consumption.  It was actually considered abuse to feed prisoners lobster more than 4 times a week...though I will admit, I might consider that a bit much myself.

For this dish, the tails can be cooked a day ahead, cleaned, and cut into bite-sized pieces.

From there, the assembly of the sauce is as easy as it is decadent.  In a skillet or wide pot large enough to hold both the sauce and the cooked fettuccine, add about a half a cup of heavy cream per serving and set the burner on medium low heat.  Add kosher or sea salt to taste (I use about a quarter tsp per serving), and freshly ground pepper.  Grate in about a teaspoon of freshly grated nutmeg (please do get a whole nutmeg.  You've just spent a fortune on the lobster, and fresh nutmeg is vastly tastier than its powdered counterpart.)  Then grate in the zest of a whole lemon.  A microplane zester is a cheap and effective tool for both of those jobs.  Stir in about a quarter cup of shredded parmesan per serving, and simmer the sauce until it just thickens slightly.  If the lobster meat is slightly undercooked, add it now.  If it is fully done, add it at the last minute, with the pasta.  

While the sauce is simmering, bring a large pot of lightly salted water to boil, and add your pasta.  The fresh pasta will take just a few minutes -- usually under three, depending on how dry it is -- to become a perfect al dente.  Once the sauce will lightly coat the back of a spoon, toss in the well drained pasta, toss to coat, and turn it out on a nice platter.  Garnish with just a bit of finely minced fresh parsley, and a sprinkling of shredded Parmesan.   
so pretty, I couldn't help posting it again

I served this with a salad with goat cheese, walnuts, and figs, which is another post, and garlic toasts made by brushing toasted slices of good crusty bread brushed with olive oil infused with fresh garlic.  Oh yes, and champagne.  Happy birthday, Mom.


Friday, September 3, 2010

a cool treat for the dog days of summer


My mom used to call them summer pickles.  Summer pickles are a great way to get some cool crunch and a bit of spice into a meal during the dog days of summer.  And they are an excellent excuse for adding a mandolin to your kitchen tools.  Cucumbers, onions, and a bit of hot pepper (I like banana peppers or jalapenos) are sliced razor thin, then soaked in a cup or so of vinegar.  I like simple white vinegar for its lack of color and clean taste, a bit of sugar, like about a teaspoon to offset the heat and the vinegar tang, salt, pepper, and enough water to cover.  My mom even added a few ice cubes to the bowl, back in the days when we were without air conditioning.

These little morsels will stay crisp and fresh in the fridge for several days.  They add a tang and a delightful crunch to any meal off the grill, take minutes to prepare, and are about as low calorie as they can get.  Sometimes a childhood summer memory has a taste all its own.  A great memory from the lake this summer, Char!

Thursday, September 2, 2010

crispy chicken


I have been on a lazy hiatus for the last couple of months, but I promise, I am back.  Jim is redoing the deck, so the grill is stuck in the garage.  Which inspired me last night to make a chicken dish that will be great in the upcoming fall months.  It is not a particularly fast dish, but it is VERY low maintenance.

I use bone-in skin-on chicken thighs for this, and the trick to very crispy skin is blessedly easy.  Simply heat a non-stick skillet over medium low heat, and place your chicken thighs skin down.  Then walk away.  Yes, just walk away.   The dish calls for lots of shallots and whole garlic cloves, so you can peel those now.   Many grocery stores carry shallots and garlic that are all ready peeled.  If you decide to take advantage of that, go practice your yoga for half an hour.  The nice thing about this dish, is that it adapts to several different vegetables.  Shown above, it is made with whole shallots, garlic cloves, and little yellow dutch potatoes, but you could substitute fennel, chunks of winter squash,or parsnips for the potatoes.  I use a whole head of garlic (about ten cloves), and about four potatoes and four shallots per person.  I love the little yellow dutch potatoes.  They hold their shape well, and they are very creamy.  But don't hesitate to substitute what you have on hand -- little new potatoes, fingerlings, or just a chunked up baking potato.

After about 30 minutes, wander back into the kitchen, and check to see if your chicken skin is nice and crisp.  If you want to reduce the fat in the dish, you can remove the thighs from the pan and pour off the excess.  Return the thighs to the pan, still skin side down, and toss in the shallots, garlic, and what ever root veg you are using.  Add a sprig of rosemary and a little salt and pepper.  If you don't have fresh rosemary, a couple of big pinches of dried is fine.  Wander away again, and contemplate how easy it would be to grow a rosemary plant in the corner of the yard or a pot on the patio.  In about 15 minutes, go turn your chicken skin side up, add a couple of cups of chicken broth, and move the heat up to medium high.  Leave the pan uncovered, and go read a few pages of a good novel.  If you are using a packaged chicken broth with a high sodium content, be careful about how much salt you add to the dish.

After about 20 minutes, take a peak in the pan.  You are looking for all that broth to reduce to a glaze -- a sort of sticky, syrupy goodness that will coat the root vegetables in a natural sauce.  When you have that, spoon your veggies onto a plate along with the sauce.  I like, then, to put the chicken back in the pan, skin side down, and cook it over a medium high heat for just a few minutes, ensuring skin as crisp as a perfect piece of bacon.  If you take this extra step, the glaze left in the pan will concentrate on the crisp skin for an added punch of flavor.

Serve with a crisp green salad and enjoy the soft golden garlic cloves smeared on a chewy slice of french bread.  Yum!