Monday, May 28, 2012

a southern classic

Yankees quite often associate grits with the poor quality, flavorless, pasty-white glue served in second-rate diners. That pile of goo is not what grits are all about. Those are likely instant grits, which are to real grits what instant oatmeal is to Irish steel cut oats. In both cases, the real deal takes some time and care to prepare, but the difference is clear to even a mildly discerning palate. Jim thought he didn't like grits, so I had never tried to prepare them for him. Then he went to a wedding on St. Simons Island in Georgia, and had the Crabdaddy's version of shrimp and grits. He came back a convert. So I went to their website and read the description of the dish to try and recreate it. Their version differs a bit from a typical Low Country SC shrimp and grits in that they toss everything in a parmesan cream sauce and serve it over two sauteed grit cakes. I thought I'd give it a whirl.

The first issue at hand was choosing the cornmeal for the grits. I looked at several different brands, and immediately eliminated both instant and quick cooking grits. I wanted some texture. Finally, I settled on Red Mill whole stone-ground cornmeal, medium grind.
 to make grits, you don't have to buy something labeled "grits"--
just get the best quality corn meal you can find

Since the cornmeal was medium grind, it was going to take awhile to cook. I started with a cup of cream and a 26 ounce carton of chicken broth. I really like Swanson's new unsalted cooking stock. It leaves me in control of the salt content. I stirred in a cup of grits, and whisked to get rid of lumps. I left the mixture over medium low heat for about an hour, stirring every few minutes, adding water as needed to keep it from getting too thick. I wish in hindsight that I had covered the pot. As the grits thicken, they shoot off occasional little molten droplets of cornmeal, which aren't fun to clean up. Better yet, next time I'll just toss everything into a slow cooker, and let them cook on their own for several hours. After the grits are soft, add in anything you want for flavor. Cheeses are great, as are herbs and spices. Taste for salt and pepper and serve as creamy grits, or pour in a pan and refrigerate to slice and saute as grit patties later.
here I used pecorino romano cheese, chives, a dollop of butter,
and a grating of fresh nutmeg

First lesson in grit patties--make the grits a little stiffer than you would if you were serving straight from the pan. Mine were too loose, and never set up very well, so the patties were difficult to fry.
these were a bit too soft, and difficult to brown, but they 
tasted good

The "shrimp" part of the equation was easy. I just gently sauteed the shrimp and set them aside, crisped up some spicy kielbasa sausage, and made a Parmesan cream sauce, which was just Parmesan and cream with a little salt and pepper. The Crabdaddy menu describes the dish as having mushrooms and tomato, so I added a bit of diced fresh tomato and a cup or so of sauteed sliced mushrooms. Though the menu description didn't include onion, I pulled one up from the garden, minced it and sauteed it along with the mushrooms, and chopped the greens for garnish.
it isn't traditional to use a cream sauce for shrimp and grits,
but a little bit of heresy never hurt the Southern sensibility  

 My second mistake with this dish was to not thicken the cream sauce by making a roux at the beginning. When making something like this for a pasta, it's desirable to keep the sauce on the lighter side (yes, I know this is not "light" from a caloric standpoint--I am referring to the body of the sauce), tossing in the slightly undercooked pasta and letting it finish in the sauce, and absorb and thicken the sauce. That isn't how it works with polenta (grits and polenta are literally the same thing, despite what confusion you run into out there on the web.Corn meal mush is the same thing, too.) The sauce was a bit runny.
 first try at this amped version of shrimp and grits was
tasty, but if I go round two, I'll tweak a few things


Perhaps next time around, I'll make the more traditional sauce, which is broth-based. I'll definitely make the grits again. The crispy little cakes are delicious.

Sunday, May 13, 2012

the king of chicken salads

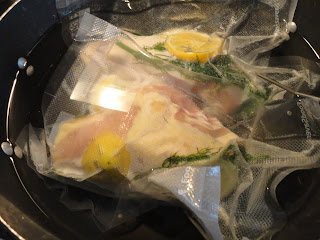
I've blogged about chicken salad before, but it's been awhile, and I've made a couple of discoveries along the way that I think are worth sharing. Jim really likes this chicken salad, and I make it fairly often. To that end, I prep chicken breasts for cooking sous vide and vacuum seal them for the freezer. That basically involves salting them, and putting sliced lemons and fresh dill in the bag, then sealing and freezing. I tend to buy chicken on sale at the grocery. Sometimes that means boneless, skinless breasts; and sometimes that means breasts with the bone in and the skin on. As happenstance would have it, the last time I made this salad, I had one boneless, skinless breast and one with both still attached. I cooked them both exactly the same, in a pot of 160 degree water, in their vacuum-sealed bags, for about an hour and a half. The difference was remarkable. Though both pieces of chicken were fine, the one with the bones and skin was remarkably more silky and flavorful. So, I have sworn off the convenience chicken ever since, opting for a little more work and a lot more flavor.

Cooking sous vide is really a great, fuss-free, and unmessy way of preparing poached chicken. If you have a vacuum sealer, I encourage you to try it. It is basically cooking food sealed in plastic at a steady temperature that you want the food to finish at.
chicken breast straight from the freezer, sealed up with
salt, dill, and lemon slices

While there are commercial cookers designed for sous vide, they aren't necessary for good results. I use a candy thermometer and a large pot to hold the water at a steady temp--about 160-165 degrees, which is a safe temp for chicken. I flip the bags over in the water every thirty minutes or so.
this is an exceptionally easy way to cook food--very
clean and hassle-free, with intense flavor

For crunch, I include almonds in this salad. As with any nut, I toast them for a few minutes. Toasting nuts will both up their crunch and intensify their flavors.
I usually use slivered almonds in this salad, but I had 
whole almonds in the freezer that required only a few minutes
in a pan, and a rough chop

romaine, spinach, peas, and onions from the garden
benefit from an hour or so in the fridge, washed and
wrapped in paper towels

I used the romaine, spinach and peas (so sweet and tender we ate them pod and all) as a salad base, and the onions went into the salad. Once the chicken is cooked, assembling the salad is just a matter of finely dicing both the white and green of the spring onions, dicing some celery, grating in the peel and squeezing in the juice of a lemon. And adding some chopped fresh dill, the diced chicken, and the almonds. Stir in just enough mayo to bind everything together, taste and adjust the seasoning.
for two chicken breasts--two ribs of celery, two large spring onions, 
one lemon zest and juice, and a big handful of chopped fresh dill

Once the chicken is cool enough to handle, just chop it coarsely, or even shred it. Stir it in to the veggies, add the mayo and almonds, and stir. Taste for salt and pepper and add a little if necessary.
this really is a flavorful and easy summer salad

A light and satisfyingly crunchy summer supper

I made some lemon poppy seed muffins to go along with the salad, and accent the lemon flavor. From a mix--Duncan Hines (or maybe it was Betty Crocker) has a decent one that produces tender, light muffins. But of course I can't leave it alone. I grate in the zest of one lemon, and add the juice to the liquid, in this case milk. Just want to turbo-charge that lemon flavor...


Wednesday, May 9, 2012

the bounty continues

I am really scrambling to use all the green stuff in the garden before it overgrows or goes to seed. So Jim and I are eating pretty healthy these days. Well, okay. Pretty healthy for us. I made a lightly wilted spinach salad, and the dressing does include bacon fat. But not a lot, okay? I wanted to update the classic wilted spinach salad, so I topped it with some nicely grilled chicken, and served the eggs on the side, deviled. Deviled eggs are such an old-fashioned dish that they are getting positively trendy. I will often take them to pot luck suppers, and people devour them.

Julia Child has, in my opinion, the perfect method for hard boiling eggs.  For 4--6 eggs, two quarts of water goes into a fairly tall and narrow pot, along with the eggs. More eggs? More water. Bring the water to a boil, slap on a cover, and take the pot off the heat. Set a timer for 17 minutes, and get a bowl of ice water ready.
letting the eggs cook off the heat eliminates the chance of overcooked eggs
with the green ring of shame around the yolks

next comes the big chill--for 20 minutes

I know I have mentioned before how much I love the farm-fresh eggs I can get at Whole Foods. Well, that's all the eggs I had on hand so I used them. But hard boiled is the one time that crappy old supermarket eggs are actually superior performers. Not that they taste better--but you can peel them. Fresh eggs are a disaster to peel, because the white hasn't lost moisture and structure, and still clings tenaciously to the shell. So I pressed on, knowing my eggs were going to look like they'd been nibbled on by mice.

Once the eggs were chilled, I painstakingly picked away the peel and popped the yolks out into a food mill. If you don't have a food mill, certainly you can just mash up the yolks with a potato masher or a fork. But if you do have a food mill, this is the perfect time to pull it out of the cupboard. It will produce very light, fluffy, and lump-free yolks.
this inexpensive gizmo is perfect for when you want smooth purees
with no skins, seeds, or lumps--it is especially handy with tomatoes

Since I had The Way to Cook out to review Julia's egg cookery, I took a look at her deviled egg recipe. She suggested adding a dollop of butter to the filling for an extra-creamy texture. Fine. I'd give it a try. I had a handful of chives from the garden, so I minced those, and threw them in with the yolks, along with salt, pepper, dijon mustard, and a bit of mayo.
a 30 second stir, and the creamy filling is ready

I put the filling into a disposable piping bag with a star tip,
but there is nothing wrong with just spooning the filling into the eggs,
the way grandma did

pretty deviled eggs with a red bell pepper and chive garnish--
though the whites are a bit chewed up with peeling accidents
 
On to the salad. Fresh little leaves of spinach, which doesn't grow the way I had imagined. Instead of little clumps of spinach we have foot-high stalks festooned with spinach leaves. A little bacon never insulted a fresh spinach leaf, so I fried two strips in little lardons, or strips about a third of an inch wide. I tossed a bone-in, skin-on chicken breast on the grill, and cooked it in about 20 minutes to an internal temp of 160, then let it rest until it was cool enough to handle.
chicken breasts come off the grill tender and juicy when they
are protected by skin and bone

I had a red onion which is a classic addition to spinach salad, but it was pretty sharp, so I decided to cook it for just a minute in the hot dressing. The dressing is simple. Hot bacon fat, white wine vinegar, dijon mustard, salt, and pepper.
wilting the onions for a minute will take away some of the bite

For another little update, I candied a few pecans with melted sugar, a bit of cayenne pepper, and a bit of curry powder. I also had some dried tart cherries on hand, so I tossed in a few of those. Dried cranberries and uncandied pecans would work as well. I had some blue cheese in the fridge as well, which contrasted nicely with the sweet fruit. The final salad came together in minutes.
a little grilled garlic bread and dinner is ready--
I should have put an egg on the plate...


Wednesday, May 2, 2012

the garden experiments

It's already summer here in South Carolina, and that means fresh, local shrimp. And as you can see from the photo, the garden is going nuts. So, for me that meant a fresh Caesar salad with spiced shrimp. I'm not a fan of most Caesar salads at casual restaurants, because they are usually a sad combination of bottled dressing, bagged croutons, and cheap parm.  Add some overcooked shrimp to the equation and you are likely north of 10 bucks for something that is mediocre at best. Made from scratch with quality ingredients, and Caesar salad becomes something altogether different. I headed out to the garden and picked some romaine leaves, washed them, wrapped them in some paper towels, and tossed them in the fridge to crisp.

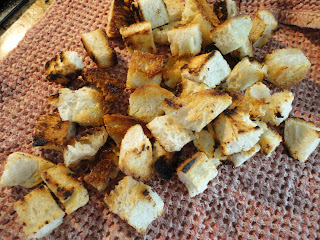
In my opinion, store-bought croutons are an abomination, and home made ones are very easy to do. I bought a small loaf of sour dough bread, removed the crusts, and cubed it into fairly large cubes. I also sliced up two cloves of garlic and put them in about 4 tablespoons of olive oil.
 about 15 minutes in a 350 degree oven will begin to toast the bread

While the bread toasted in the oven, I threw together the dressing. It is traditional to toss the dressing ingredients one at a time with the romaine lettuce, but I just tossed everything into the blender to make things even easier. The blender will also emulsify the dressing more efficiently than a hand-toss, making a creamier dressing. For the two of us, I used one egg that I had boiled for one minute.  That will barely begin to set the white, making for a creamier dressing. To that I added the juice of one lemon, about a teaspoon of anchovy paste, a half a tablespoon of Worcestershire sauce, a pinch of salt and a few grinds of fresh pepper.  Then I added about three tablespoons of olive oil and blended it all together, until I had a nice creamy dressing. What about the garlic? I sometimes find the taste of raw garlic a bit overwhelming, so I had a different plan to bring that classic flavor into the mix.  Once I had infused the oil with the garlic, I drained the oil into a hot pan to fry the croutons, and tossed the peeled shrimp with the garlic slices and a couple big pinches of red pepper flakes.
 it only takes about 30 minutes to infuse the shrimp with garlic and pepper

 in the mean time I fried the croutons in the hot garlic oil

Toasting the croutons in the oil took about 10 minutes, and I had fresh, crisp little cubes of bread. The shrimp cooks extremely quickly as well.  I lowered the heat under the same pan that I toasted the bread in, and sauteed the shrimp very gently, just until the were opaque, about 7 or 8 minutes.
  a gentle heat will assure both that the shrimp won't toughen 
and that the garlic won't burn

 Both the beauty and the danger of cooking seafood, particularly delicate shellfish like shrimp and scallops is that they can go from perfectly cooked to overcooked in less than a minute. Remember that they will continue to cook from residual heat, and take them off the fire as soon as they have just turned opaque.

From there, it's merely a matter of tossing the torn romaine with about 1/2 a cup of freshly grated parmesan cheese, the shrimp, croutons, and the dressing, and you have a delicious, light summer dinner.
a refreshing, light mid-week dinner that is cheaper and likely
tastier than what you can get at your neighborhood restaurant