Thursday, October 11, 2012

winging it

Since I am working to get out of my cooking doldrums, I decided to take a run at one of Jim's bar favorites--chicken wings. They couldn't be too hot, and they needed to be very flavorful. Traditional chicken wings are usually deep-fried first, then tossed in a rich and spicy sauce. Not the route I wanted to go, particularly to avoid the hassle and mess of deep frying. I also wanted something to use up some of the dribs and drabs of Asian sauces I have haunting the fridge and the pantry.

I started with the wings. Drummettes--$3.89 a pound!?! Even the whole wings rang in at $2.49 a pound. I can remember when the butcher could barely give those scrawny appendages away.  Oh well. I went with the whole wings. They are easy to break down, and the wing tips could go in my stock bag in the freezer, ready to do their thing for a nice chicken stock (the recipe is for beef stock, but the method is the same for chicken stock.)
a cleaver makes quick work of chopping off the tips, and
jointing the wings--though a knife will certainly work as well

I scanned a couple of recipes for Asian chicken wings. They varied a bit, but all of them included soy, some heat, garlic, and a sweetener of some sort; most, hoisin and some sort of citrus element. A great way to create a successful marinade without sweating over a recipe and buying a bunch of stuff is to just consider the basic elements--here sweet, heat, salt, and citrus--then use what you have on hand. I wanted some orange flavor, but I didn't have an orange or any orange juice. I did have some orange marmalade. Perfect. That took care of both the citrus and the sweet. I had hoisin, soy, tamari, sesame oil, sriracha (oriental chile sauce), five spice powder, garlic, and honey.
measuring isn't that important--tasting is. Just add a bit
of everything, going easy on the sweet and the heat to start, 
and adjust until it tastes good

the wings can marinate an hour--or a day or two

As soon as I stashed the wings in the fridge I realized I had a problem. I intended to bake these wings in a 400 degree oven, elevated on a rack, to encourage them to brown and crisp. The sugar in the marinade would certainly drip down on the pan and burn before the wings were close to done. I wasn't interested in a charred baking sheet and a smoke-filled kitchen. Foil, and a foil swap half way through the bake was an easy solution.
all that dripping marinade will burn. Just line the baking sheet 
with foil, and swap it out with fresh foil once the marinade begins to smoke

Swapping the foil is pretty easy to do. Just lift off the rack of wings, pick up the old foil, and lay down a new sheet, then slide them back into the oven.  While the wings cook, bring the leftover marinade to a boil, and reduce by about half, for a thick glaze to dip the wings in, before returning them to the oven for another 5 minutes.
reducing the glaze will kill any bacteria from the raw chicken, 
and give you a thick glaze for the final trip in the oven

crispy wings, ready for a final dip and a few minutes in the oven

sprinkled with sesame seeds, and served with some Asian slaw,
these wings make a fun dinner, or a party appetizer

Tuesday, October 9, 2012

vegetarian decadence

I've been absent for several months, with really no good reason other than my own selfish ennui. J developed some stomach issues, and with that came cooking complication.  All of the sudden onions, garlic, tomatoes, peppers, alcohol, vinegar, beans, and pretty much anything spicy came off the shopping list. I was flummoxed, and instead of rising to the occasion, I subjected both of our palates all summer long to plain grilled meats, fish, and veggies. Plain rice and potatoes dominated the starch category. No squeeze of lemon or fresh garden tomatoes welcome. I met a new challenge and I folded. I'm ashamed.

That said, with some diligence and a bit of medical science he is on the road back to being able to eat a wider variety of foods, with just a few adjustments. I've discovered that many of the verboten ingredients lose some of their ferocious kick with long simmering and a judicious hand. "Hot" is still out, but I have found ways to spice things up on my own food without assaulting J's stomach and his peace of mind. My first leap into the abyss started with a wonderful vegetarian lasagna featuring tomatoes, eggplants and herbs from the late summer garden. I had to buy zucchinis and squash. As quickly as our crop came, it disappeared.
zucs, squash, and mushrooms get diced for the filling--
in the small bowl are some diced eggplants, salted to remove moisture
I constructed the sauce from garden tomatoes, simmered whole to remove moisture and loosen the skins, then passed through the coarse disc on a food mill, to eliminate seeds, skins, and cores. A food mill is an inexpensive and handy tool to have when you want to separate out the bad stuff and keep the good stuff.
with a food mill, the pulp and juice pass through the holes, 
while the seeds, skins, and stems stay behind

The sauce is lightly cooked tomatoes, salt, garlic, a bit of
red pepper flake, and fresh basil

To mellow the garlic even more than it would during baking, I have used the trick of microwaving a few cloves on high for 15 seconds. The resulting steam partially cooks the garlic, and as a bonus, makes the skins slip right off. I limited the red pepper flakes to just a couple of pinches--very little in the overall scheme of ingredients.

While the sauce flavors melded, I squeezed the eggplant dry, and very gently sauteed all of the veggies in a splash of olive oil. The idea is not to brown the veggies, but to significantly reduce their moisture. Ordinarily I would have added a chopped onion and bell pepper as well to this mixture, and I suggest you do. I just didn't want to push things too far on this first foray into the forbidden foods.
the idea here is a significant reduction of the moisture in the veggies

once the veggies were done, I wilted a bag of baby spinach, cooked with
a tablespoon or so of dried shallots--for some onion flavor without
the volatile compounds
Once the spinach is wilted, wrap it in a kitchen towel and wring the bejeezus out of it, to remove as much moisture as possible. Vegetable liquids in a lasagna = watery, unappetizing fare.
veggies are combined and allowed to cool for assembly

I have read in Cooks Illustrated on several occasions that cottage cheese is superior to ricotta in lasagna--it doesn't become grainy, adds a bit of tang, and adds some welcome creaminess. All right, I'll bite. I gave it a shot. Whole milk or 2% cottage cheese combined with a cup of cream, and a cup of shredded parmesan. An added teaspoon of corn starch will help everything stay thick in the final dish. I added some lemon zest for brightness without acid, and a grating of nutmeg for some warmth. Then I grated some mozzarella and prepared for assembly.
the addition of cornstarch to the cottage cheese mixture
ramps up the creamy texture
I strongly recommend grating your own mozzarella. The pre-shredded stuff is treated to prevent clumping, which will also affect the gooey quality of the cheese in the baked dish. Squeeze the balls of mozzeralla--the softer they feel, the less rubbery the cheese will be. I tend to prefer Polly-O cheese, found usually near the shredded cheeses, though I have found that cheese quality varies by brand through different regions. Partially freezing the cheese before grating makes grating easier.

assembly--sauce, Barilla no-boil lasagna noodles, veggies, mozzarella,
and cottage cheese

I really love Barilla no-boil lasagna noodles. They are hassle-free, come out very similar to home-made noodles, and absorb any excess moisture in the lasagna. Start with a third of the sauce in a pan coated with non-stick spray. Add a layer of noodles, half of the veg, a generous sprinkle of mozzarella, and half the cottage cheese mixture. Repeat. Finish with a layer of noodles, the remaining sauce, and a layer of mozzarella.

I made two--a small one for our dinner, and a larger one
for the freezer, and a later informal dinner with friends

Cover both pans with foil sprayed with non-stick spray, and pop one in the freezer wrapped in a layer of plastic wrap, if you are making two, which is a great idea for an easy meal down the road. The one you are eating now can go into a 375 oven for about 40 minutes, or until bubbly. Remove the foil, and bake for another 15 minutes, or until the cheese begins to turn golden.

a fifteen minute rest, and it is ready to serve with a little garlic toast
and a sprinkling of fresh basil
I love this dish for several reasons. It is loaded with vegetables, delicious to eat, pretty to look at, and satisfyingly simple. I also love that it can be made ahead, and popped in the fridge or freezer for later baking.
I can clean up the kitchen before dinner, which means relaxing after dinner, and it is hearty enough vegetarian fare for even the most carnivorous of diners.


Friday, June 22, 2012

enough already

Jim came in last night with the day's harvest from the veggie garden. I know this will eventually end, but in the mean time, the zucchini plants are covered in new starts, the tomato plants are loaded with fruit, all undoubtedly plotting to ripen at once, and the peppers are starting to get serious.
one day--yes, one day-- from the garden. That giant in the middle
weighs in at 1.8 pounds, surrounded by 3 more zucchini, three yellow squash, 7 peppers,
an eggplant, and tomatoes

I am going to be forced to toss vegetables on my neighbors' porches and flee. I have found several recipes that I like for the zucchini. One is my take on an Ina Garten gratin recipe that I tweaked a bit, based on reviews. Thank you, Amazon, for the concept of posting customer reviews unvarnished for all the world to see. Ina sautes her zucchini before adding it to the sauce, and several reviewers complained that the zucchini was a bit mushy. That is an easy fix.
 long thin ribbons treated to a salt rub for an hour extracts
a great deal of moisture and improves texture--
just remember to rinse and squeeze dry

The gratin starts with sauteed onion. I had a few shallots, so I used those instead, cooking them until they were just soft.
a tablespoon or so of flour goes in with the onion to cook out
the raw flour taste

to that I added some half and half, some arugula that needed using,
a few grates of nutmeg, and salt and pepper

Ina's version didn't call for arugula, but I needed to use it, and adding a few more veggies never hurt anyone. The uncooked zucchini gets stirred in with everything.
20 minutes in a 375 degree oven will cook the zucchini without 
making it mushy

The topping is fresh bread crumbs and a bit of gruyere cheese, for a crunchy finish. I grind leftover slices of bread into crumbs in the food processor, then freeze them, so I always have some on hand. 
about 2 cups of breadcrumbs and 1 cup of cheese top this off

this was a delicious side for a succulent grilled pork chop

Saturday, June 16, 2012

the zucchini chronicles

More monsters coming out of the garden, so this time I did my riff on a raw zucchini salad with lime, chile, tomatoes, and roasted peanuts. It is a riff on a recipe I found on the food network site. Slicing zucchini into thin ribbons on a mandolin, salting them, rinsing them well, and squeezing them dry in a towel creates luscious ribbons that are supple and tender, reminiscent of perfectly cooked home-made pasta.
the perfect tool for razor thin slices of zucchini--next step,
an hour in a salt scrub

This salad is a wonderful side for an easy grilled chicken breast or a simple piece of fish. The dressing is a quick whisk together of a couple of tablespoons of fish sauce (don't worry, it does not end up tasting like fish--fish sauce is a wonderful ingredient for bringing out the rich flavors of other ingredients), fresh lime juice from a couple of limes, minced hot red chili (fresh if ya got 'em, but dried would work) to taste, a couple of tablespoons of brown sugar, and a minced clove of garlic all whisked together. If you want an even silkier mouth-feel, add a tablespoon or two of peanut oil. Take a couple of handfuls of cherry tomatoes, slice them in half, and put them in the dressing to marinate.
give the tomatoes a few minutes to marinate while you toast the peanuts

One step I never skip when cooking with nuts is toasting them. It only takes a minute or two, albeit at close attention, to crisp the nuts significantly, and release their tantalizing aroma. Just use a dry pan and give them a toss or two over medium high heat.
simplicity itself--a bit of chopped cilantro, toasted chopped peanuts, 
and the dressing just before the tomatoes were tossed in
Rinse the excess salt off the zucchini ribbons, squeeze them dry in a kitchen towel, and toss them with the tomatoes. Plate, garnish with the peanuts and cilantro, and enjoy a bite of summer.

a beautiful salad that tasted as good as it looked

I served this salad with a simple piece of fish marinated with a little ginger and a sprinkle of soy. Along with a crisp white wine and a cool breeze on the patio, it was a perfect summer supper.

Saturday, June 2, 2012

the monsters lurking in the back yard

The back yard has been overtaken by giant, multi-tentacled monsters, spitting out their spawn faster than the unscrupulous owner of a puppy mill. They looked innocent enough when Jim brought them home. Four sprightly youngsters, ready to become a part of the family. But looks can deceive, and I am left dealing with the fallout...
three of four of the monstrous squash plants, lorded over by even
larger tomato plants

the fork is on the table to give you an idea of the size of these--
a single day's harvest

My quest for zucchini preparations has become nearly overwhelming. Two days ago I made a black bean chili loaded with cubes of squash. It turned out very well, so I suppose I should have documented it for the blog, but I didn't. Last night I turned to a bacon and zucchini quiche. It too turned out to be very tasty. In the coming days expect a squash gratin, and a very interesting-looking squash ribbon salad with lime and red chili dressing and toasted peanuts.

The trick when adding zucchini to any preparation that needs moisture to be controlled is to extract as much moisture from the squash as possible before combining them with the other ingredients. The process involves slicing or shredding the zucchini into a colander, generously salting it, and letting it sit in the sink for an hour or two.
zucs can be grated on a box grater, but I like the pretty
little batons this gizmo produces

The other benefit of salting is the change of texture that the salt induces. The stiff flesh becomes silky and luscious as it loses its moisture. After the zucchini has softened, rinse away the excess salt, and squeeze the flesh out in a clean kitchen towel. And I mean squeeze like you mean it. Like you're squeezing every last deduction you can find into your tax return.

Set the zucchini aside, and start frying three or four strips of bacon cut into little 1/2 -inch wide batons, called lardons. While that fries to crispy perfection, slice half an onion into strips. Cutting them pole-to-pole will make for more attractive pieces, but they are going inside a quiche, so I suppose it doesn't matter. Once the bacon has crisped, remove it from the drippings and drain it on paper towel. Leave about a tablespoon of the fat in the pan, and saute the onions over medium heat until they are tender and golden, which should take about 20 minutes, with you giving them a stir every few minutes. While those brown, grate whatever cheese you want to use. You'll need about a cup. I used a Swiss cheese very similar to Gruyere called Comte, and a little knob of regular Swiss I had laying about in the fridge. Cheddar would do, goat cheese would do, smoked Gouda would do--just about anything that will melt well would do.

Then prepare your filling. Three eggs to one cup of either light cream or half and half makes a nice tender quiche filling. To that I add a few grates of fresh nutmeg, a pinch of salt (not too much--there is salt in the bacon, the cheese, and the zucchini) and whisk it up. A regular whisk or even a fork will combine things quite nicely, but I like to get out my immersion blender for the job. Just lazy I guess, because it gets the job done in about 4 seconds.
to the custard I added a few leaves of chopped parsley
and some fresh thyme--again, many different herbs would work--
dill, oregano, cilantro, marjoram, basil...

During the last few minutes of the cooking time for the onions, add in the zucchini. Now would be a good time to preheat the oven to 350 degrees.
the idea here isn't to cook the zuc, but to let it release
even a little more moisture

Okay, in the interest of full disclosure, I confess that I succumbed to the siren song of ready-made frozen pie crusts. Though I have a great pie crust recipe I have somehow managed not to have a pie pan. And since I make rustic tarts when a pie is called for, that really hasn't been issue. But quiche doesn't really lend itself to the rustic tart method. I bought a Marie Callendar frozen crust already in the pan, and it wasn't half bad.
cooked veggies go in first--right into a still-frozen crust--
then cheese, then bacon, then custard

ready for the oven--for pete's sake, put in on a pan-- 
it is a spillover waiting to happen, both in the oven 
and on the way there
this quiche took about 40 minutes to cook to golden perfection
in a 350 degree convection oven

While the quiche rests for about 10 minutes, throw together a little salad for a perfect side. I used grape tomatoes and arugula tossed in a simple vinaigrette of lemon juice, grainy mustard, dried minced shallot (love that shortcut ingredient), salt, pepper, and olive oil.
dinner is served--I was hungry and didn't let the quiche rest long enough,
so the slices were a little messy

If you are making this for guests, let the quiche rest as much as twenty minutes, until it is just warm, for more lady-like slices--if your guests are the sort to prefer style over substance. If it is just you and your family, by all means dig in after just a five or ten minute rest, while the cheese is still all oozy and the custard is a tender cloud. Your stomach won't notice that you didn't use great Aunt Esther's antique pie server to transfer perfect slices to Wedgwood china plates.
One zucchini down. Only 437 to go before the end of the summer.


Monday, May 28, 2012

a southern classic

Yankees quite often associate grits with the poor quality, flavorless, pasty-white glue served in second-rate diners. That pile of goo is not what grits are all about. Those are likely instant grits, which are to real grits what instant oatmeal is to Irish steel cut oats. In both cases, the real deal takes some time and care to prepare, but the difference is clear to even a mildly discerning palate. Jim thought he didn't like grits, so I had never tried to prepare them for him. Then he went to a wedding on St. Simons Island in Georgia, and had the Crabdaddy's version of shrimp and grits. He came back a convert. So I went to their website and read the description of the dish to try and recreate it. Their version differs a bit from a typical Low Country SC shrimp and grits in that they toss everything in a parmesan cream sauce and serve it over two sauteed grit cakes. I thought I'd give it a whirl.

The first issue at hand was choosing the cornmeal for the grits. I looked at several different brands, and immediately eliminated both instant and quick cooking grits. I wanted some texture. Finally, I settled on Red Mill whole stone-ground cornmeal, medium grind.
 to make grits, you don't have to buy something labeled "grits"--
just get the best quality corn meal you can find

Since the cornmeal was medium grind, it was going to take awhile to cook. I started with a cup of cream and a 26 ounce carton of chicken broth. I really like Swanson's new unsalted cooking stock. It leaves me in control of the salt content. I stirred in a cup of grits, and whisked to get rid of lumps. I left the mixture over medium low heat for about an hour, stirring every few minutes, adding water as needed to keep it from getting too thick. I wish in hindsight that I had covered the pot. As the grits thicken, they shoot off occasional little molten droplets of cornmeal, which aren't fun to clean up. Better yet, next time I'll just toss everything into a slow cooker, and let them cook on their own for several hours. After the grits are soft, add in anything you want for flavor. Cheeses are great, as are herbs and spices. Taste for salt and pepper and serve as creamy grits, or pour in a pan and refrigerate to slice and saute as grit patties later.
here I used pecorino romano cheese, chives, a dollop of butter,
and a grating of fresh nutmeg

First lesson in grit patties--make the grits a little stiffer than you would if you were serving straight from the pan. Mine were too loose, and never set up very well, so the patties were difficult to fry.
these were a bit too soft, and difficult to brown, but they 
tasted good

The "shrimp" part of the equation was easy. I just gently sauteed the shrimp and set them aside, crisped up some spicy kielbasa sausage, and made a Parmesan cream sauce, which was just Parmesan and cream with a little salt and pepper. The Crabdaddy menu describes the dish as having mushrooms and tomato, so I added a bit of diced fresh tomato and a cup or so of sauteed sliced mushrooms. Though the menu description didn't include onion, I pulled one up from the garden, minced it and sauteed it along with the mushrooms, and chopped the greens for garnish.
it isn't traditional to use a cream sauce for shrimp and grits,
but a little bit of heresy never hurt the Southern sensibility  

 My second mistake with this dish was to not thicken the cream sauce by making a roux at the beginning. When making something like this for a pasta, it's desirable to keep the sauce on the lighter side (yes, I know this is not "light" from a caloric standpoint--I am referring to the body of the sauce), tossing in the slightly undercooked pasta and letting it finish in the sauce, and absorb and thicken the sauce. That isn't how it works with polenta (grits and polenta are literally the same thing, despite what confusion you run into out there on the web.Corn meal mush is the same thing, too.) The sauce was a bit runny.
 first try at this amped version of shrimp and grits was
tasty, but if I go round two, I'll tweak a few things


Perhaps next time around, I'll make the more traditional sauce, which is broth-based. I'll definitely make the grits again. The crispy little cakes are delicious.

Sunday, May 13, 2012

the king of chicken salads

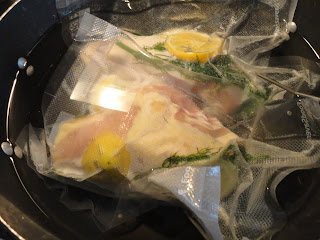
I've blogged about chicken salad before, but it's been awhile, and I've made a couple of discoveries along the way that I think are worth sharing. Jim really likes this chicken salad, and I make it fairly often. To that end, I prep chicken breasts for cooking sous vide and vacuum seal them for the freezer. That basically involves salting them, and putting sliced lemons and fresh dill in the bag, then sealing and freezing. I tend to buy chicken on sale at the grocery. Sometimes that means boneless, skinless breasts; and sometimes that means breasts with the bone in and the skin on. As happenstance would have it, the last time I made this salad, I had one boneless, skinless breast and one with both still attached. I cooked them both exactly the same, in a pot of 160 degree water, in their vacuum-sealed bags, for about an hour and a half. The difference was remarkable. Though both pieces of chicken were fine, the one with the bones and skin was remarkably more silky and flavorful. So, I have sworn off the convenience chicken ever since, opting for a little more work and a lot more flavor.

Cooking sous vide is really a great, fuss-free, and unmessy way of preparing poached chicken. If you have a vacuum sealer, I encourage you to try it. It is basically cooking food sealed in plastic at a steady temperature that you want the food to finish at.
chicken breast straight from the freezer, sealed up with
salt, dill, and lemon slices

While there are commercial cookers designed for sous vide, they aren't necessary for good results. I use a candy thermometer and a large pot to hold the water at a steady temp--about 160-165 degrees, which is a safe temp for chicken. I flip the bags over in the water every thirty minutes or so.
this is an exceptionally easy way to cook food--very
clean and hassle-free, with intense flavor

For crunch, I include almonds in this salad. As with any nut, I toast them for a few minutes. Toasting nuts will both up their crunch and intensify their flavors.
I usually use slivered almonds in this salad, but I had 
whole almonds in the freezer that required only a few minutes
in a pan, and a rough chop

romaine, spinach, peas, and onions from the garden
benefit from an hour or so in the fridge, washed and
wrapped in paper towels

I used the romaine, spinach and peas (so sweet and tender we ate them pod and all) as a salad base, and the onions went into the salad. Once the chicken is cooked, assembling the salad is just a matter of finely dicing both the white and green of the spring onions, dicing some celery, grating in the peel and squeezing in the juice of a lemon. And adding some chopped fresh dill, the diced chicken, and the almonds. Stir in just enough mayo to bind everything together, taste and adjust the seasoning.
for two chicken breasts--two ribs of celery, two large spring onions, 
one lemon zest and juice, and a big handful of chopped fresh dill

Once the chicken is cool enough to handle, just chop it coarsely, or even shred it. Stir it in to the veggies, add the mayo and almonds, and stir. Taste for salt and pepper and add a little if necessary.
this really is a flavorful and easy summer salad

A light and satisfyingly crunchy summer supper

I made some lemon poppy seed muffins to go along with the salad, and accent the lemon flavor. From a mix--Duncan Hines (or maybe it was Betty Crocker) has a decent one that produces tender, light muffins. But of course I can't leave it alone. I grate in the zest of one lemon, and add the juice to the liquid, in this case milk. Just want to turbo-charge that lemon flavor...


Wednesday, May 9, 2012

the bounty continues

I am really scrambling to use all the green stuff in the garden before it overgrows or goes to seed. So Jim and I are eating pretty healthy these days. Well, okay. Pretty healthy for us. I made a lightly wilted spinach salad, and the dressing does include bacon fat. But not a lot, okay? I wanted to update the classic wilted spinach salad, so I topped it with some nicely grilled chicken, and served the eggs on the side, deviled. Deviled eggs are such an old-fashioned dish that they are getting positively trendy. I will often take them to pot luck suppers, and people devour them.

Julia Child has, in my opinion, the perfect method for hard boiling eggs.  For 4--6 eggs, two quarts of water goes into a fairly tall and narrow pot, along with the eggs. More eggs? More water. Bring the water to a boil, slap on a cover, and take the pot off the heat. Set a timer for 17 minutes, and get a bowl of ice water ready.
letting the eggs cook off the heat eliminates the chance of overcooked eggs
with the green ring of shame around the yolks

next comes the big chill--for 20 minutes

I know I have mentioned before how much I love the farm-fresh eggs I can get at Whole Foods. Well, that's all the eggs I had on hand so I used them. But hard boiled is the one time that crappy old supermarket eggs are actually superior performers. Not that they taste better--but you can peel them. Fresh eggs are a disaster to peel, because the white hasn't lost moisture and structure, and still clings tenaciously to the shell. So I pressed on, knowing my eggs were going to look like they'd been nibbled on by mice.

Once the eggs were chilled, I painstakingly picked away the peel and popped the yolks out into a food mill. If you don't have a food mill, certainly you can just mash up the yolks with a potato masher or a fork. But if you do have a food mill, this is the perfect time to pull it out of the cupboard. It will produce very light, fluffy, and lump-free yolks.
this inexpensive gizmo is perfect for when you want smooth purees
with no skins, seeds, or lumps--it is especially handy with tomatoes

Since I had The Way to Cook out to review Julia's egg cookery, I took a look at her deviled egg recipe. She suggested adding a dollop of butter to the filling for an extra-creamy texture. Fine. I'd give it a try. I had a handful of chives from the garden, so I minced those, and threw them in with the yolks, along with salt, pepper, dijon mustard, and a bit of mayo.
a 30 second stir, and the creamy filling is ready

I put the filling into a disposable piping bag with a star tip,
but there is nothing wrong with just spooning the filling into the eggs,
the way grandma did

pretty deviled eggs with a red bell pepper and chive garnish--
though the whites are a bit chewed up with peeling accidents
 
On to the salad. Fresh little leaves of spinach, which doesn't grow the way I had imagined. Instead of little clumps of spinach we have foot-high stalks festooned with spinach leaves. A little bacon never insulted a fresh spinach leaf, so I fried two strips in little lardons, or strips about a third of an inch wide. I tossed a bone-in, skin-on chicken breast on the grill, and cooked it in about 20 minutes to an internal temp of 160, then let it rest until it was cool enough to handle.
chicken breasts come off the grill tender and juicy when they
are protected by skin and bone

I had a red onion which is a classic addition to spinach salad, but it was pretty sharp, so I decided to cook it for just a minute in the hot dressing. The dressing is simple. Hot bacon fat, white wine vinegar, dijon mustard, salt, and pepper.
wilting the onions for a minute will take away some of the bite

For another little update, I candied a few pecans with melted sugar, a bit of cayenne pepper, and a bit of curry powder. I also had some dried tart cherries on hand, so I tossed in a few of those. Dried cranberries and uncandied pecans would work as well. I had some blue cheese in the fridge as well, which contrasted nicely with the sweet fruit. The final salad came together in minutes.
a little grilled garlic bread and dinner is ready--
I should have put an egg on the plate...