Wednesday, August 17, 2011

quiche...it's what's for dinner


When I don’t quite know what I want to cook for dinner, I sometimes turn to eggs, making a simple omelet, or a quiche.  Last night, I had some cream and milk I wanted to use, as well as bacon and onions in the refrigerator, so I decided on a classic quiche Lorraine, served with an easy salad on the side.  I had cream cheese on hand as well, so I made a tender crust--the recipe is the same as the one here, minus the sugar.  Even easier--buy a frozen crust at the grocery.  I like to keep a couple in the freezer for when I don’t feel like making pie dough from scratch.

Quiche is a wonderful blank slate for using odds and ends in the refrigerator.  One can use various bits of vegetables, and small amounts of several different cheeses.  Broccoli and cheddar is a good combination, as is ham, Swiss, and asparagus.  Red bell pepper, goat cheese, and arugula make a fine combination.  Consider mushrooms, cooked leftover chicken, and spinach, with feta.  Whatever vegetables you decide to use, just be sure to cut them small and sauté them until they are crisp/tender, and have given up a good deal of their moisture, so the quiche isn’t watery.
 bacon crisps, then the onions cook in the rendered fat

I blind bake the crust in a 375⁰ oven for about 15 minutes to prevent it from becoming soggy once the egg mixture is added.  I usually use dried beans to weight the crust.  Pie weights will work if you have them.  If you don’t have either, just “dock” the crust with a fork (poke several holes in it) and when you take it out of the oven, deflate any risen areas with a fork.  Scatter your ingredients across the bottom of the crust, and pour in the egg custard mixture.   It is a good idea to place the pie plate on a cookie sheet to catch any run-over and save yourself the hassle of cleaning the oven.
 a simple whisk job makes a wonderful filling

Quiche Lorraine

(makes enough for 1 nine inch pie crust)
4 strips bacon, cut into ¼ inch lardons
½ medium onion, cut pole-to-pole in ¼-inch strips
½ cup milk
½ cup cream
4 eggs
1 cup guyere cheese
½ tsp nutmeg
½ tsp salt
½ tsp pepper

Heat the oven to 375.  Bake the crust, using beans or pie weights, for about 15 minutes.  While the crust is baking, sauté the bacon until crisp.  Remove the bacon with a slotted spoon, and sauté the onions in the bacon fat until they are light brown and wilted.  Combine the milk, cream, eggs, cheese, nutmeg, salt, and pepper, and whisk until thoroughly combined.  Sprinkle the bacon and onions over the bottom of the crust, and pour over the egg mixture.  Bake the quiche for about 30 minutes, or until the egg is set and the top golden brown.
 puffy, golden deliciousness

a thin, crispy version of quiche with lightly dressed salad 
on the side

Friday, August 5, 2011

oven dried tomatoes

I have gathered and frozen a bounty of tomatoes from my garden, but this heat wave we're having here in the Carolinas has taken a toll on my plants, and I want more.  Whole Foods recently acquired a batch of small, heirloom tomatoes that are delicious.  I have little room left in my freezer, so, what to do?

Dry a batch, and freeze.  Once their volume is reduced, their flavor is intensified, and they take up little room in the freezer.  And they do need to be frozen.  Unlike commercially dried tomatoes, home-dried ones retain enough moisture that they can develop mold.
a variety of heirloom tomatoes, split in half and ready for the oven

Placing the split tomatoes on a rack allows the air to circulate around the tomatoes.  I dry them for about 3 hours in a 200 degree oven (if you have a convection oven, use it--the additional air circulation will dry the tomatoes even faster), then bag them when they are cool, for a taste of summer sweetness in winter dishes.  Drying them longer will of course reduce the moisture even more (um, duh, Gail).  I keep the time to around 3 hours so the tomatoes will still maintain a bit of their tender bite.
the finished product

These tasty little bites are a great addition to a cold weather tomato sauce, a scampi, or a salad of fall greens.  I think, since the little local gems are so good this year, I will be drying another round. 

Thursday, August 4, 2011

brown bag lunches for grown ups

When finances are tight, one of the first places people look for some savings is the lunch bill.  Packing school lunches for kids is the norm, and there are plenty of ideas out there for great child-friendly, healthy lunches.  But what about the grown ups?  A few days of the same old turkey sandwiches and congealed leftovers, and its back to the chain restaurant specials (which often aren’t so special) and the fast food meals loaded with calories and salt.  
This brown bag recipe calls for boneless, skinless chicken breast, but consider changing things up a little with some leftover steak or lamb, or even some grilled zucchini or eggplant.  Though the chicken in this recipe calls for a marinade, there is no reason to let it sit.  In fact, the acid in the yogurt can make the chicken a bit mushy, so just dunk and grill (or broil.) 
Naan bread is softer than pita, but pita pockets will do if you can’t find naan. 

Marinade:

4 oz. Greek yogurt (thicker than plain yogurt.  You can also simply drain plain yogurt in a tea towel)
1 ½ tsp garam masala (available in the spice aisle)
1 tsp chili powder
1 tsp salt
1 fresh hot chile pepper, such as jalapeno or Serrano
Juice of half a lemon
2 TBS chopped cilantro
Mince the chile, and mix all of the ingredients together.  Add two chicken breast halves, either whole, or sliced if you prefer them to cook more quickly.   I grill mine whole, and they are easy to slice as I need them.  Make this when you are already grilling or broiling something, and let them tag along.  They can be stored, fully cooked, in the fridge, until you are ready to make lunch.

Make a simple sauce.  Combine:
1 seeded, peeled, diced cucumber (a melon baller is a great tool for seeding a cuke--gather the diced cubes up in a kitchen towel and wring out the extra moisture)
1 small hot pepper, minced
1 green onion, minced
1 tsp salt
Juice and zest of 1/2 lemon
1 tsp finely minced fresh mint
2 TBS minced cilantro
 
diced cucumber, draining in the sink--you can just wring
it out in a towel

the beautiful beginnings of a raita

 the end result, with the addition of some Greek yogurt

Sandwich assembly:

1 piece of naan bread
small tomato, chopped and drained on a paper towel
minced hot pepper to taste (remember there is already some in the marinade and raita)
3 thin slices of onion (white onion works very well, and can be toned down by a quick rinse in cold water)
Handful of chopped cilantro
1 half sliced, marinated, cooked chicken breast
Optional garnishes are thinly sliced pickle, shredded cabbage or lettuce, and Tzatziki  or raita sauce

Stuff the sliced chicken, tomato, pepper, onion, cilantro, and any other garnishes in the naan or pita pocket, alternating layers so you have all of the flavors throughout.  Wrap in foil or parchment paper.  If you are using tzatsiki or raita sauce, pack it in a little container to add at lunch time to prevent your sandwich from getting soggy.   With a little planning, you can have a brown bag lunch in no time, loaded with tasty and interesting ingredients!
not your typical brown bag lunch

Friday, July 29, 2011

from the humble, the sublime

I made french toast last Sunday, and since there are just two of us, half a loaf of challah bread sat on the counter for several days, taunting me.  Bread pudding was calling out to me.  And I had  caramel sauce in the fridge, which lasts forever once you have made it.  No dessert is more humble and beautiful at the same time as a good bread pudding.  I cubed the bread, heated the oven to 350, and dotted it with a bit of butter.  Ten minutes produced a light toast on the bread.
even with already stale bread, a light toast is in order

Bread pudding is a forgiving dessert--it will accept nearly all comers.   Shredded apples, sliced peaches, minced dried apricots, mangoes, currents, nuts of any kind.  This time I went with traditional.  Raisins plumped in a bit of rum (because I had it.  Bourbon is probably better), and pecans toasted in the oven for about 10 minutes, then chopped.  
The pudding was simple.  Four eggs, about 1 1/2 cups of light cream, a cup of sugar, and a teaspoon each of nutmeg, cinnamon, lemon zest, and salt.  Whisk like you mean it.
getting ready to add a furious minute or two of whisking

The oven goes on at 325.  I added the nuts and raisins to the bread, poured on the pudding mixture, and added it all to a buttered casserole dish.
 
ready for the oven

40 minutes later-- would like to say I read War and Peace
in the interim, but more likely, I watched SuperNanny


What looks like a mess comes out of the oven 40 minutes later ready to do time as an elegant finish to any meal.  I keep the caramel sauce in a squeeze bottle that can warm in the microwave in a minute, ready to decorate a simple serving of delicious bread pudding.  What a great fate for some stale bread, haunting my counter top.
guess I'm not being very humble, but I think any 
New Orleans cook would be proud of this plate

Tuesday, July 26, 2011

the basil is going crazy

I have a dilemma.  I have basil plants outside just going nuts, and I still have basil pesto in the freezer from last year.  Yes, I know, I must have been nuts not to use it all up over the winter.  But to make room for this year's harvest, I have been using last years harvest in any dish I can dream up.  So last night, I made up a dish from the freezer.  Pesto, pancetta, and peas, with little pasta shells that have been lingering too long in my pantry.  It was delicious, and ready for the plate in under 30 minutes.
some sliced pancetta and a hot pepper from the garden, 
along with a bit of frozen pesto -- dinner was fast


Pancetta is easy to find these days -- most grocery stores have it in the deli, ready to be sliced very thin.  Bacon will suffice in a pinch, but pancetta is not smoked, so the flavor is very different.  It crisps up much the same, and adds some great texture to a creamy dish.  I started by frying the pancetta in one of my beloved pans, and as it crisped, I added in the sliced hot pepper for a little kick.
I am still enamored with these French pans

While the pancetta crisped and the peppers softened, I boiled up some pasta shells.  While many different pasta shapes would do here, I like the shells particularly.  Their little cupped shape scoops up peas and pesto with alacrity.   I know it is the height of summer, but I must admit to using frozen peas.  Peas are a springtime treat, and we are far past spring.  Frozen peas are one of the best frozen veggies in the market.  Picked at the height of their season and flash frozen, the end product can often be superior to the peas you find in the veggie section at the market.  If someone told me I could have only two frozen veggies for the rest of my life, I would choose frozen peas and frozen pearl onions.  I don't even want to talk about the grim chore of peeling fresh pearl onions.

Once the shells were al dente and the pancetta crisp, I drained the pasta, tossed the still frozen peas in the empty pot along with the frozen pesto, and heated it all over low heat, just until everything melted.  In went the pasta, and I tossed it all together.
Onto a plate, and on with the crispy pancetta and hot peppers.  Lovely dish, from the garden, the freezer and the pantry, all together in less than 30 minutes.  Can't complain about that....
Impromptu mix of spring and summer flavors


Monday, July 11, 2011

roasted tomato soup with fennel and orange

We are bursting at the seams with tomatoes. Another light summer soup seems in order.  This one with roasted tomatoes.  Roasting makes tomatoes super easy to peel and core.  They can be roasted in the oven or on  the grill.  About 20 minutes yield tomatoes with blackened skins and cores that are easy to pluck out with your fingers.  Let them cool for a few minutes, then pluck off the skins, pluck out the cores, and add the juices that have accumulated in the pan into a sauce pan to reduce.  After about five minutes, add the tomatoes, and a finely shaved head of fennel, reserving a few of the wispy fronds of fennel for garnish.
soup at its most simple and seasonal

Once the tomatoes have reduced and the fennel is tender, turn off the heat, add in the zest and juice from a small orange, and salt and pepper to taste.  Blend it up in a blender to smooth it out, or better yet, just go at it with an immersion blender right in the pot.
a most handy tool, like a portable blender

Put a cheese sandwich on the grill, and prepare for summer heaven, ready in just 30 minutes.  Throw the leftovers in the fridge and serve cold as an appetizer with some diced cucumber and herbs on top at your next dinner party.  Heavenly, and ever so light on the palate.
the smooth flavor of garden tomatoes, accented
with the licorice of fennel, and the citrus punch of orange

Monday, June 27, 2011

gad zuccs!

I dream of being pursued by giant green monsters.  Of being buried in an avalanche of heavy red orbs.  Of being lost in a dense green forest growing wildly before my very eyes...

Yes, my garden is in full flourish, and every day, when I go out back to inspect things, more and more veggies and herbs are ready to pick.  Keeping up with the produce production has become a challenge.
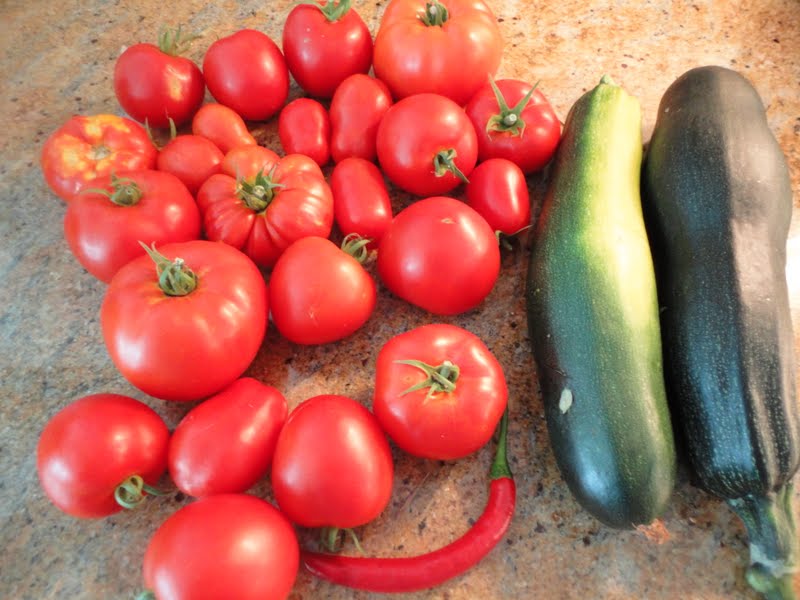
a single day's harvest from 4 tomato plants, two zucchini plants
and three pepper plants

The pepper plants are burgeoning with peppers, but I am leaving them to ripen.  I love chiles when they have ripened to a sweet, hot red hue, and they aren't as often available that way in the grocery store as their young, green counterparts.  The numbers and rate of growth on the two zucchini plants is downright scary.  And, as for the tomatoes...I will be making sauce like an Italian grandma all summer long.  Time for some new preparations.

I have a forest of herbs in the garden as well as the veggies.  So I decided to use some of my parsley as the greens in a salad.  By limiting it to a couple of handfuls, the flavor stays in balance with the remainder of the ingredients.
the bright green hue of the parsley is beautiful -- effectively 
washed and dried in this perfect little herb/salad spinner

I decided to make a salad using zucchini "ribbons".  The ribbons can be cut with a vegetable peeler, or on a little mandolin.  I didn't peel the zucchini, wanting the dark green contrast to the white of the flesh, but I did discard the outermost slices, which were mostly skin.
this handy little gadget cuts perfect, and perfectly thin slices
of a variety of foods

Once the ribbons were cut, and the seedy core of the zucchini discarded, I placed them in a colander, and coated them with a couple of teaspoons of salt to draw out some of the considerable moisture.  After half an hour, I rinsed away as much of the salt as possible, and dried them on a pile of paper towels.  This salting process had an unexpected benefit.  It lent an impossibly silky texture to the ribbons, giving them the mouthfeel of a tender, well-cooked pasta, and a silken texture that made draping them about the plate a breeze.

For a salad dressing, I combined lemon juice and olive oil, along with a small dab of mustard, salt and pepper, and emulsified it in my little blender.  The only thing left to do was assemble the salad.  I cut a couple of those gorgeous tomatoes into little wedges, and tossed together the zucchini ribbons, tomato wedges, thinly sliced hot red pepper, and parsley to create a salad that looks like the essence of summer.
a drizzle of dressing, and a near perfect salad is born

Thursday, June 23, 2011

stew in the summer? really??

Yes, stew in the summer.  The only resemblance this dish has with a stew is that it is thick and rich with vegetables from the season.  Cooking time is under 30 minutes, it's a one-pot wonder that comes out perfect no matter what veggies you throw in, and it has the heat and sweet of  fabulous summer vegetables.

Two cans of light coconut milk go into a pan.  I chose to use the light version of coconut milk because it has about 70 percent fewer calories and fat than the regular stuff.  Boneless, skinless chicken (one full breast in this case) gets sliced crosswise into thin slices, and simmered in the coconut milk, just until cooked through -- about 15 minutes.  While the meat simmered, I chopped the veggies.
 in this case, I had both hot and sweet pepper, scallions, cilantro,
and two kinds of mushrooms--shitake and something called a bunapi mushroom


 The bunapi mushrooms were a new one on me.  Whole Foods had them, so I gave them a try.  Score!  When cooked, they had a smooth, silky texture and added a creamy earthiness to the dish.  When your grocer has an unusual type of mushroom, don't hesitate to give them a whirl.
I had both lemon grass and galangal root in the freezer
galanal is similar to ginger, just a bit more spicy--they can really be used interchangeably

I know I have mentioned this before, but both lemongrass and ginger (or galangal if you happen upon it) freeze perfectly.  No need to defrost.  Just run the frozen pieces across a microplane grater for lovely ginger and lemongrass snow, then toss the leftover pieces right back in the freezer.  I do remove the tough outer leaves of the lemongrass before freezing, but I never bother to peel ginger.
microplane graters--fantastic for grating ginger, lemongrass, cheese,
nutmeg, citrus zest--no kitchen should be without one (or two, or three)
When the chicken is nearly cooked through, I added the ginger and lemongrass, a pinch of five-spice powder, and a bit of salt.  In went the veggies, just to cook until crisp-tender.  I reserved the cilantro to be added after the stew was off the heat.  I used peppers, scallions, and mushrooms because that's what I had.  Other veggies to consider would be broccoli, very thinly sliced carrots, zucchinis, snow peas, snap peas, and a last minute addition of some mung bean sprouts (they are better if they stay crisp).  If I were adding broccoli or carrots, I would send them into the coconut broth a few minutes before the more delicate veggies.  Once the veggies have become tender, you are ready to serve.
I garnished with cilantro here--if I had them I might have added
a handful of bean sprouts, and perhaps a sprinkling of chopped peanuts

So stew on a hot summer day can be a delicious, simple dish to prepare, loaded with seasonal vegetables and delivering a refreshing crunch, seasonal flavor, and a short stint in front of the stove.


Wednesday, June 15, 2011

summer veggies

A bounty of summer vegetables is showing up here in the south, at the farmer's market, in the grocery stores, and in my garden out back.  Jim and I ate our first two beautiful Early Girl tomatoes with breakfast on  Sunday morning.  They were delicious, and put me in the mood to exploit some of the exquisitely fresh  vegetables available locally.

First order of business was to think of ways to make unusual preparations of summer vegetables.   And that made me think of soup.  People don't often think of soup in the summer, but cool, creamy soups can be an excellent way to use fresh vegetables, and a refreshingly light addition to the supper table.  I started my experimentation with a fresh corn soup served at room temperature.  When buying sweet corn, look for ears with a tight, smooth sheath of leaves that are bright green and moist.

Shucking is easiest done outside, over a sheet of newspaper that can then be wrapped around the husks and silk and tossed in the trash or the compost pile.  A simple way to remove the kernels from the cob is to split the corn crosswise in the middle, turn each section on the stable end, and run a knife down the kernels of corn.  Once all of the kernels have been removed, over a bowl, scrape the back of the knife over each cob to remove the "cream" of the corn, which is full of sweet corn flavor.
corn kernels from three ears each of fresh white and yellow corn

the "cream" from those same six cobs

My goal was to maximize the fresh corn flavor in my soup, so I pureed the "cream" in a blender, and set it aside to add at the end, uncooked.  I roughly chopped half of a sweet onion, and sauteed it in about a tablespoon of butter, just until it was translucent.
the chop needn't be precise here -- everything is going into the blender in the end

Add the corn kernels, a couple pinches of salt, and about three cups of water.  Simmer until the corn kernels are very tender, but not overcooked, about 20 minutes.  A healthy and low calorie way to make the soup creamy is the addition of some cooked rice.  One quarter cup of rice cooks up into about a cup of cooked rice.  While the corn simmered, I cooked the rice.  Once it was done, I added it to the pot.
ready for the blender

I allowed the cooked corn and rice to cool a bit, then processed it in the blender in two batches.  Processing hot food in a blender can be tricky.  The steam from the food combined with the vortex created by the blender can make food "explode" out of the container.  So, if you are going to process hot foods, be sure and leave plenty of air space in the blender.

Once the corn and onions were pureed, I pushed the liquids through a fine sieve.  The next time I make this soup, I think, instead of blending and straining it, I will put the corn through a food mill.  I think a food mill would have done a better job of creating a completely smooth soup.

Just to make the soup even a little creamier, I stirred in a couple of dollops of sour cream, along with the uncooked corn "cream".  The addition of sour cream is totally optional, but I like the tart zing that the sour cream brings to the party.  A couple of lower-calorie options would be low-fat buttermilk, or even Greek yogurt.  Topped with a bit of chopped chives and served with a thin slice of garlic toast, this summer soup was a delicious rendition of sweet corn essence.
I love the beautiful pale yellow color

Thursday, June 9, 2011

lasagna!

I love a good lasagna.  I have never made one that didn't have loads of cheese, including mozzarella and creamy ricotta.  But I had some mushrooms and fresh local tomatoes that needed using, and I thought I would try a different tack.  A lasagna made with a white sauce and a creamy mushroom tomato sauce.

First things first.  The tomato sauce.  I sliced some green garlic from a local farm very finely on my hand-held mandolin, then sliced onions,cremini  mushrooms and sweet bell peppers.  Fresh thyme, oregano, and parsley rounded out the sauce flavors, along with some salt and pepper.
"green" garlic isn't really green -- it simply hasn't dried out yet --
the farmer from Red Fern farm gave me some uncured garlic --
she grows six different varieties

I sauteed the garlic, onions, peppers, and mushrooms, then added chopped, fresh, local tomatoes.   I also added some dried wild mushrooms hydrated in a bit of water, for a little interest.  I wanted some body in the sauce, so I went to the fridge for tomato paste, and didn't have any.  No worries.  I hydrated some sun-dried tomatoes in a little hot water, and ground them to a paste in a blender.  Last in the pot -- a bit of chopped thyme, oregano, and parsley from the garden.
a couple tablespoons of cream enriched the vegetable-laden sauce

I put the finished sauce in a bowl, and rinsed out the pan to make the white sauce.  No sense in making more of a mess than necessary.  A white sauce is a simple affair.  Equal parts butter and flour, cooked into a paste.  I used about four tablespoons each, and cooked them together for about five minutes.  I added salt, pepper, and some freshly grated nutmeg, then slowly added about 3 cups of milk I had heated in the microwave.  Once all of the milk was incorporated, and the sauce was smooth, I added about one and one half cups of grated Parmesan I had in the fridge.  

From there, it was simply assembly time.  I am a huge fan of Barilla's "no boil" lasagna noodles.  No pre-cooking necessary, and the baked noodles taste very similar to home-made pasta.  A layer of tomato sauce to prevent sticking in the bottom of the pan, then a layer of noodles, another layer of tomato sauce, a layer of white sauce (bechamel), noodles, tomato sauce, bechamel, noodles, sauce, bechamel.... you get the picture.  Once the casserole dish was full, I topped it off with a bit of grated mozzarella and my last bit of grated parm, covered it with foil, and baked it for about 45 minutes.
one of the things I love about lasagna -- nearly all of the kitchen
cleanup can be done while it bakes

Forty-five minutes in the oven, another twenty minutes without foil, and a ten minute rest out of the oven produces a perfectly golden dish of cheesy goodness.  You can certainly add meat, but in this case, I didn't think it was necessary.  A bowl of crisp salad, some crunchy grilled garlic bread...  Yum...

Tuesday, June 7, 2011

peach cobbler

The peaches here in the Carolinas are to die for at the moment.  They aren't very big, but they are packed with flavor and juice.  I think they are wonderful simply eaten out of hand, bent over the sink so all of those juices don't run down the front of my shirt.  But I do like to make a dessert for Jim on occasion, so all those gorgeous peaches made me think of a cobbler.  There are a couple of different styles of cobbler -- one style is more cake-like, made with a batter -- but I prefer a cobbler topped with a biscuit-like dough with a crunchy top.

The first order of business is peeling the peaches.  The easiest way to peel peaches is to blanch them in simmering water for half a minute or so. 
once the peaches cool, the skin slips away easily
against the edge of a knife

once the peaches are peeled, they can be cut into segments roughly the size of orange segments.  This is best done over a bowl, to catch all of the juices.
I used a mix of yellow and white peaches -- 
whatever I could find at the fruit stand already ripe that day

When it comes to fruit desserts, I am a purist.  I want the fruit to be the star.  While wandering around the internet, looking at cobbler recipes, I was appalled at the amount of sugar in most of them.  For about 4 cups of peaches, many recipes called for about a cup of sugar.  Fruit abuse, in my opinion.  I added about 3 tablespoons of sugar to my already sweet peaches.  A touch of cinnamon is traditional, but I think it muddies the fruit flavor, so I left it out.  I do, however, think that lemon really enhances the flavor of most fruits, so I added the zest and juice of a lemon.  I added a tablespoon of flour just to thicken the fruit juices a bit.

Next came the "cobble".  The "cobbler" moniker comes from the resemblance the topping has to a cobbled street.  I make my favorite biscuit dough -- flour, salt, baking powder, butter, sugar, and light cream  -- and then add a bit more cream to make a loose, sticky dough.
the "cobble" was the texture of a drop biscuit

If you are interested in making a cobbler, just find a good biscuit recipe, and increase the moisture a bit, to form a sticky dough.  Once you have dropped it over the peach mixture, sprinkle on a tablespoon or so of sugar to help crisp the top.  Bake it at 425 for about 20 minutes, or until the topping is crisp, and the peaches are bubbling at the edges.
a very easy, and scrumptious, dessert
pretty elegant-looking for a simple dessert

Wednesday, May 25, 2011

less complicated -- still Thai

Yesterday I posted about a fairly complicated Thai dish.  Today I am posting one that any home cook can carry off.  The sauce includes fish sauce.  Don't be afraid of that condiment.  It does not have a "fishy" taste in the final dish, and is really there to lend salt and "umami" flavor to the dish.  "Umami" is just a certain uncutuousness -- a rich flavor often identified as the fifth taste, after sweet, salty, sour, and bitter.

As with all Far East cooking, dishes come together very quickly, so it is best to prep all of your ingredients in advance.  In this case, that means mincing a couple of cloves of garlic -- easy with a garlic press-- slicing some onion and bell pepper, mincing some hot pepper, and stirring together some sauce.  On a separate cutting board, it takes just a minute to cube up some boneless, skinless chicken breast.  Basil is the star of this dish, and it is abundant right now.  The leaves should be plucked from the stems, but they don't need to be sliced.
mise en place for a simple Thai basil chicken
The sauce for the dish is easy.  A tablespoon of fish sauce, 3 tablespoons of soy sauce, 2 tablespoons of water, a teaspoon of sugar, and a tablespoon of cornstarch, all stirred up together and set aside.  The cubed chicken gets cooked in hot oil for about 8 minutes -- just until it is done.  
the chicken is quickly sauteed, then comes out of the pan

Once the chicken is out of the pan, in go the veggies.  They cook for a couple of minutes, until they begin to soften, then the garlic goes in.  You will smell it's fragrance in about two minutes.  Add in the sauce mixture and the chicken, and toss to combine.  Add in the basil, and cook just until that has wilted a bit.
veggies, just wilted

The whole dish comes together in just a few minutes, and it tastes divine.
an easy and exotic Thai supper

Tuesday, May 24, 2011

unraveling a Thai dish

Jim and I rarely go out to eat, since I love to cook, but when we do, we usually opt for Thai food.  I don't cook a lot of Thai, because it can be complicated, and we have an excellent Thai restaurant close by.  But I will admit, it is one of my favorite cuisines.  The other night I tried a new dish at the restaurant.  It was so good, I couldn't resist trying to replicate it.  The fun part was the research.  In the course of trying to find out about the bones of the dish, I discovered that Thai cuisine sometimes uses five spice powder, which explains the subtle spice I tasted on the chicken, including a faint hint of clove, which had thrown me off a bit when first tasting the dish.  I had never tasted clove in a Thai dish before.  Speaking of five spice, I have mentioned before the astounding recipe from China Moon that is actually a ten-spice concoction.  Well worth making.  I finally ordered Szechwan peppercorns from Penzeys, so I could make it properly.  

So, this dish -- it was a chicken dish with small pieces of chicken, fried, with an ethereally light crust and a hint of warm spice.  The veggies were lightly steamed, and it all sat in a pool of a sweet/sour/spicy sauce.  My first search was for the sauce.  I finally settled on a recipe I found on the net that included fresh red chiles, which I happened to have on hand.  It's a simple sauce, including garlic, chiles, sugar, vinegar, water, and salt.  It is thickened in the end with a bit of cornstarch.
the sauce has a gorgeous color and a nice consistency

The next step was the veggies.  I happened to have beautiful little zucchinis in the garden, an onion, a leek, carrots, and bell peppers on hand.  I had to go to the store for chicken, so I grabbed a little broccoli and snow peas as well.
lovely little zucs and a handful of cilantro from the garden,
which is going berserk 

Then, I marinated the thin strips of chicken in a little oyster sauce, some fish sauce, a clove of garlic, a little five spice powder, and the chopped cilantro.  I only marinated it for about an hour.  During that time, I sliced the veggies thin on a mandoline, steamed them to crisp/tender, and shocked them in an ice bath.
so beautiful


the shock, after the brief steam

Now, for the chicken.  I mixed about 3/4 cup of corn starch, 1 cup of rice flour, and a tablespoon of five spice powder together, and dredged the marinated chicken in that.  In about 1/2 inch very hot oil, I fried the strips in batches until they were crisp and golden brown.  The corn starch and rice flour mixture resulted in a very thin and beautifully crunchy crust with a wonderfully spiced flavor.
the chicken was crispy, without a hint of greasiness

Now, all to do was combine everything.  I reheated the veggies in a cup or so of the sauce, tossed in the chicken, and served everything over rice.  It was divine.  Crisp veggies, spiced chicken, and spicy/sweet/hot sauce.  It wasn't an exact duplicate of the dish I had at the Thai restuarant, but it was close, and absolutely delicious.  Well worth the effort.
a very delicious dinner